Finally updated my mentality to Vue 3. I’ve updated my Mac OS from Catalina to Monterey a while ago and started to thinking about software update accordingly. The big one was Node, I’ve been using the version 12 for such a long time, so decided to update to v16. Thanks to nvm, I can switch versions when I needed. And started to try Vue3.
Vue3, Vite server, it’s just amazingly FAST!!! I’m loving it.
import axios from "axios";
import VueAxios from 'vue-axios'
app.use(VueAxios, axios);

app.mount("#app");

// with in a component add this
add(payload) {
const path = "URL";
this.axios.post(path, payload)
.then(() => {
I’ll update when I noticed something converting from vue2 to VUE3
I wonder how often you make an animation. Maybe not so frequently or not consciously. How about PowerPoint or a similar presentation software?
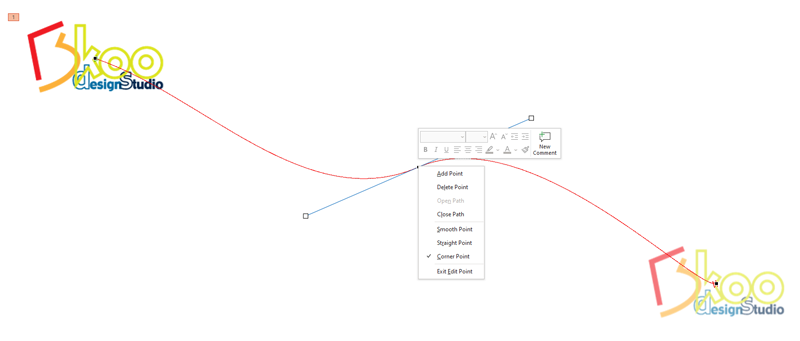
PowerPoint has a set of pre-made animations, and you can apply to a text or image. I think people are pretty familiar to apply these animations.<br> <b>How about “Path Animation”?Perhaps you don’t use it so regularly, but it’s sometimes very effective. One tip that I recommend who is not familiar with the Path Animation, it’s better to choose “ARCS” instead of “LINES”, because A “LINE” has only a start and an end point, no point in between and you cannot add another editing point later. So you cannot edit the path shape later.
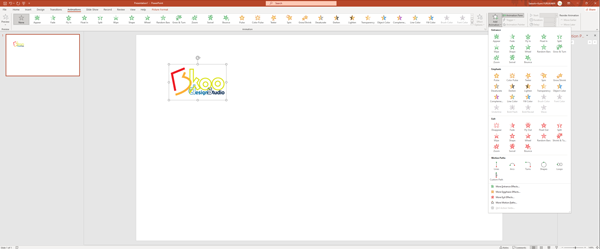
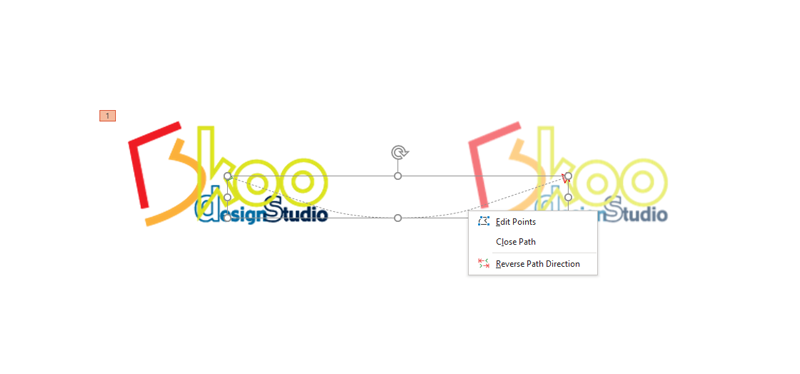
Once you select an image or text box, apply “ARCS” path, it plays automatically once. Then Right-Click and select “Edit Points” to edit the path.
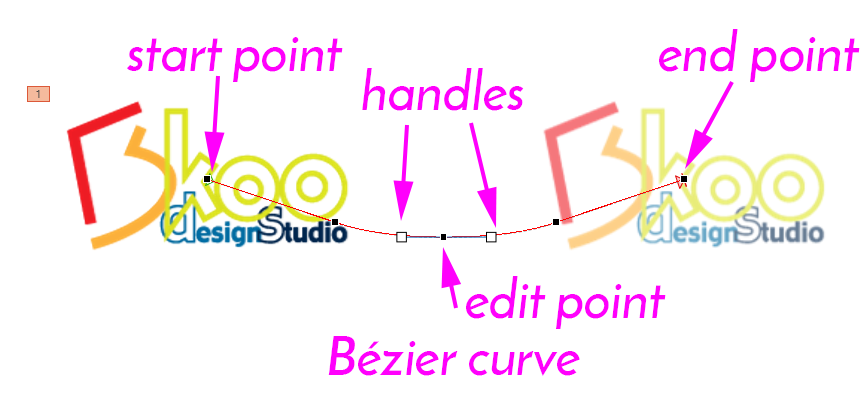
The path is called a “Bézier curve“. You can edit the curvature with the selected edit point to move around and use handles’ both side to control the curvature tangent(direction).
You can add or delete an edit point for the path until you are satisfied the flow.
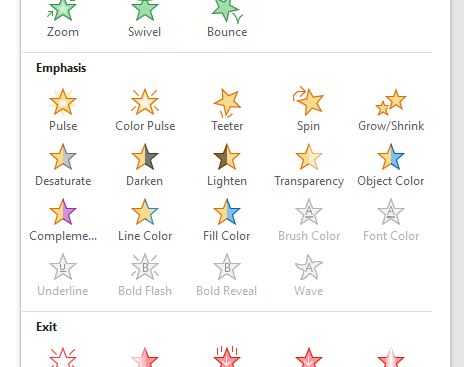
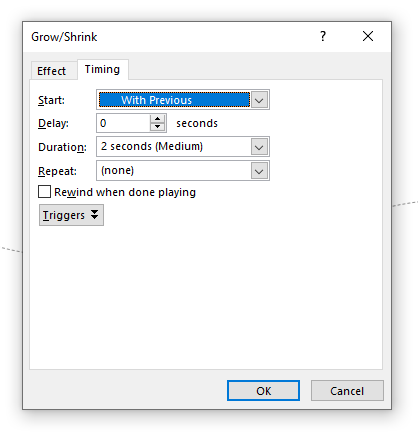
Also, if you add another animation preset such as “Grow/Shrink”, then set the “Timing” to “Start [with previous]”.
You can animate the path Move(Transition) and Grow/Shrink at the same time.
Sometimes too much animation will destroy the entire presentation, so use animation efficiently.
I just got a phone call from a local small business owner. The person, I don’t know how the person found me, need 2,000 business card estimate. I recommended to use CostcoBuisinessPrinting.com.
Why?
It’s because of the cost!
First I’m always looking for a job and client, the size doesn’t matter. I myself just a single freelance for design, multimedia (video, animation, web dev etc…) productions. Working with a small job is relatively much easier and quicker turn around because less people involved that a mid-size to large corporation. Always welcome a small business client or individual. But now a days, thanks to the internet and web-based services, a lot of things can be done by non-professionals. Like brochures, business card even website.
Print collateral
I recommend costcobusinessprinting.comor shutterfly.com etc… google “custom business card, brochure etc…” you can find a very good deal and tons of design templates to choose from. You can upload your own photo taken by yourself from your smartphone and easily layout using the templates and order desired quantity. These sites are very well done and High Quality Do it yourself production. Also the printing cost is unbeatable because of the quantity they can handle. Professional printing shop also uses an ink-jet printer , slightly complex and higher quality (on demand printer) than one you have, but they run thousands of them simultaneously. So they can handle a small lot as well. Also shipping cost, they can make a good deal with logistic companies. + the can locate somewhere cheaper than CA.
Website
WordPress is one of the most famous website builder, if you sign up your domain with an ISP(internet service provider) such as GoDaddy or Bluehost, it’s come with it. And you don’t need to know any HTML/CSS, It’s a bit complicated for a beginner at the beginning but a lot of instructions are also available via the internet, thanks to YouTube! So you can build a good looking your own business (or personal blog) website so quickly, easily (once you got started) and free (except the hosting fee and the domain fee etc… but something like $25/months)
MS Office 365 and Google Drive and apps
I think you know that MS Office (Word, Excel, PowerPoint etc.. + storage) and Google similar services are free to use (some limitation on MS Office 365). I’m pretty sure some people uses only a tablet for business, no more computer, no more office space (Starbucks 😎).
So what professionals do then?
It’s a super good question, I’ve been asking to myself for a long long time. The simplest answer is “Time is money“. A good sense (design sense + skills) take a long time of studies, practices and experiences. So you are hiring a professional to save your time. And also your have to know what exactly you want, a clear vision and have to know where to look for.
Also It’s good idea to find out what you CANNOT DO by yourself. You’ve tried and stuck somewhere, then ask for a professional advise, once the problem is clearly outlined, it’s easy to find out why you need a pro. and what type of pro you need. So we can answer your questions much easily and efficiently.
On last thing, a good service is the best marketing 😃
$ git checkout --filename.ext(remove the file filename.ext from git)
$ git status(show current status of git, I execute it before git add .)
$ git restore filename.ext(before commit, restore the file to previous status, even file is saved, the content is back to the before)
CLEAN UP GIT
$ git clean -df projectName(clean up git)
HEAD
$ git log --oneline --graph(show list of commit.)
$ git reset --hard HEAD(go to current HEAD.)
$ git reset --hard HEAD^ (go back to the 1 commit from current HEAD.)
$ git reset --hard HEAD~2(go back to the 2 commits from current HEAD.)
$ git reset --hard index(go back to the commit where the index is)
UPDATED 09/16/2021
Just encounter an accident, so I’m updating the post.
Accidentally overwritten a file!! OMG. A awesome thing about git is you can retrieve a file or files later. Usually right after you save a file and notice a mistake and Ooops, I shouldn’t save the file, in stead save as different file name. Anyway if you saved and noticed, means you have not git commit the change. So simply:
$ git status (show status what has been modified)
$ git restore fileName(restore the file)
IMPORTANT: Once you notice, you need to change the file name before do git restore, so you can have both.
If you’ve already git add . + committed, you should use
git reset --hard HEAD^ (go back to the 1 commit from current HEAD.)
IMPORTANT: before git reset, always nice to have a current backup somewhere else in local or remote.
Do you know or have you heard “git” or maybe “github”?
Wiki definition
Git (/ɡɪt/)[7] is software for tracking changes in any set of files, usually used for coordinating work among programmers collaboratively developing source code during software development. Its goals include speed, data integrity, and support for distributed, non-linear workflows (thousands of parallel branches running on different systems).
Even you are not a programmer or computer software/web developer, I think this tool is a super useful. If you only use Word, Excel etc.., anything that you need to save some data as a file, it’s very helpful to manage your project.
EXAMPLE: You are working on a project to input some data to an Excel spreadsheet. You boss come and ask to add a new column [Gender] and input (F) or (M), so you follow the order. A few days later, your boss came again and ask to add other 2 columns [F] and [M], divide data [Gender] to [F] and [M], if it’s (F), input “1” to [F} column, if it’s (m), [M] to 1. So you worked on the devision. Next day, your boss come again and said bring back to [F] and [M] to [Gender] and a few days later… Things like this happen all the time, isn’t it.
If it’s simple(but stressful 😫) as the example, probably when you’ve asked to add the 2 columns, you save the current file as different file name as a backup before adding these, and you continue working on the same file. So list,exl and list-backup1.exl. But I’m pretty sure that your boss come again and ask more changes… and so on, You’ll make so many backups and alternative files, the project folder getting messy easily. Imagine if you are saving files at the Desktop… nightmare!! Also if are working with some other collaborators to share the folder or even a file together, it’s so hard to manage and track what’s going on in the project folder, what have been changed and by who.
git can help manage the project.
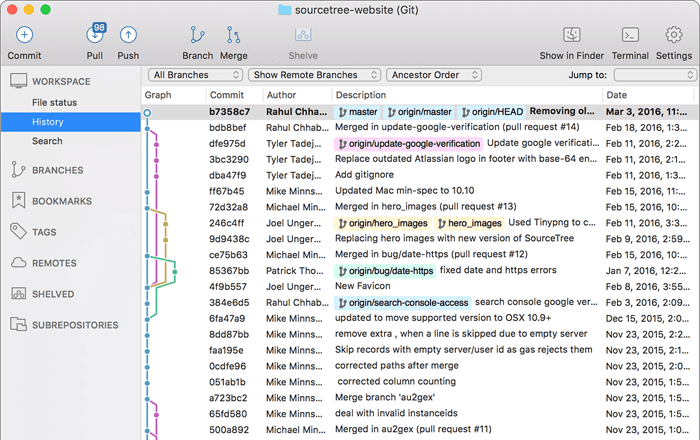
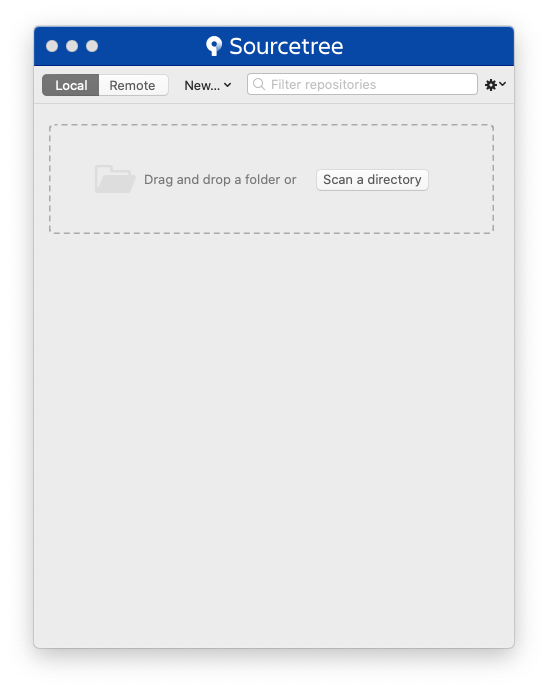
The GUI (Graphic User Interface) is available for free, I recommend Sourcetree, available both Mac and Windows.
(if you have some problem with Mac Mojave or later, simply move the downloaded app to Applications folder and launch, The OS prompt you to allow access to the app, type your OS user password to authorize.)
It’s good to se Author name and Author Email address especially if you work with others but it’s up to you. You can change this setting later too
New (cmd⌘+ N || CTL+N), select [local]. Add a folder Drag/Drop | [Scan a directory] to select a folder where you want to start using git.
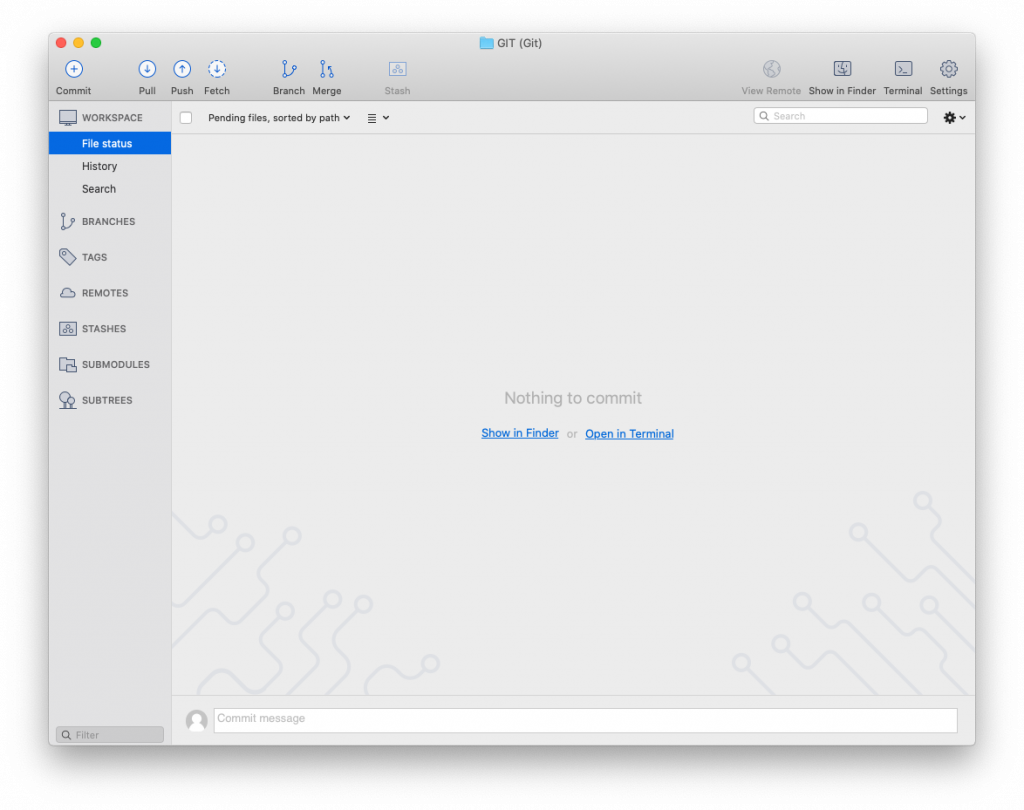
Once you select a folder, click on the folder name,
then the project window appear, it’s look like this. (I’ve add a folder called “GIT”)
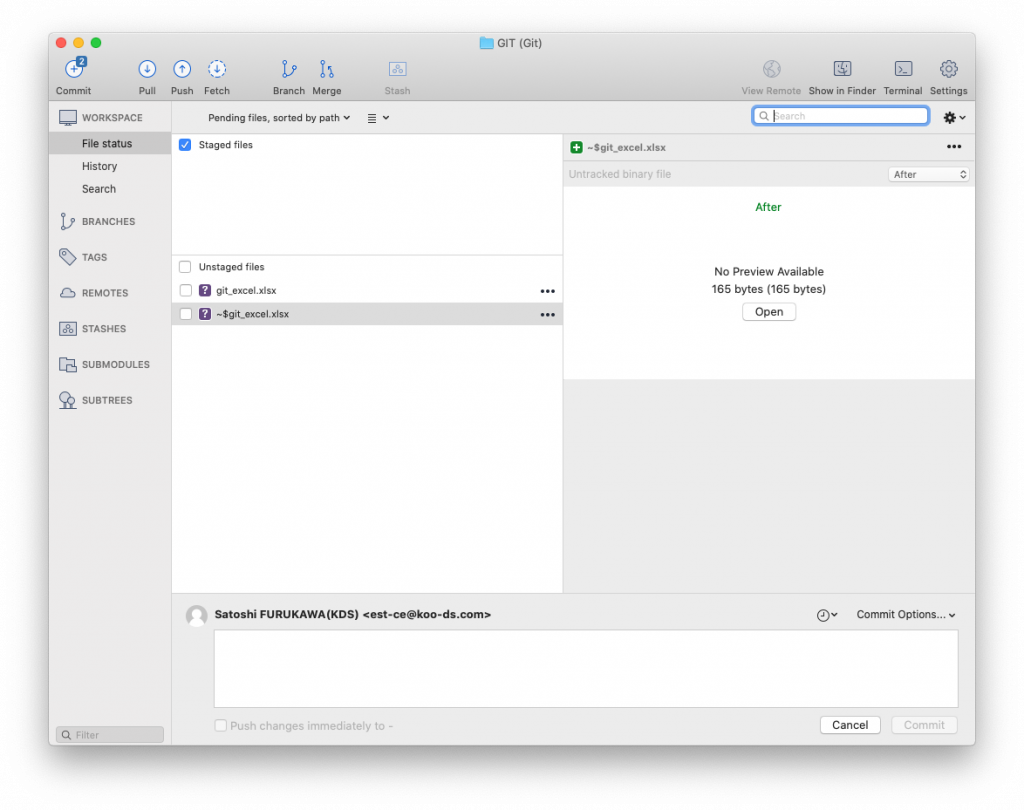
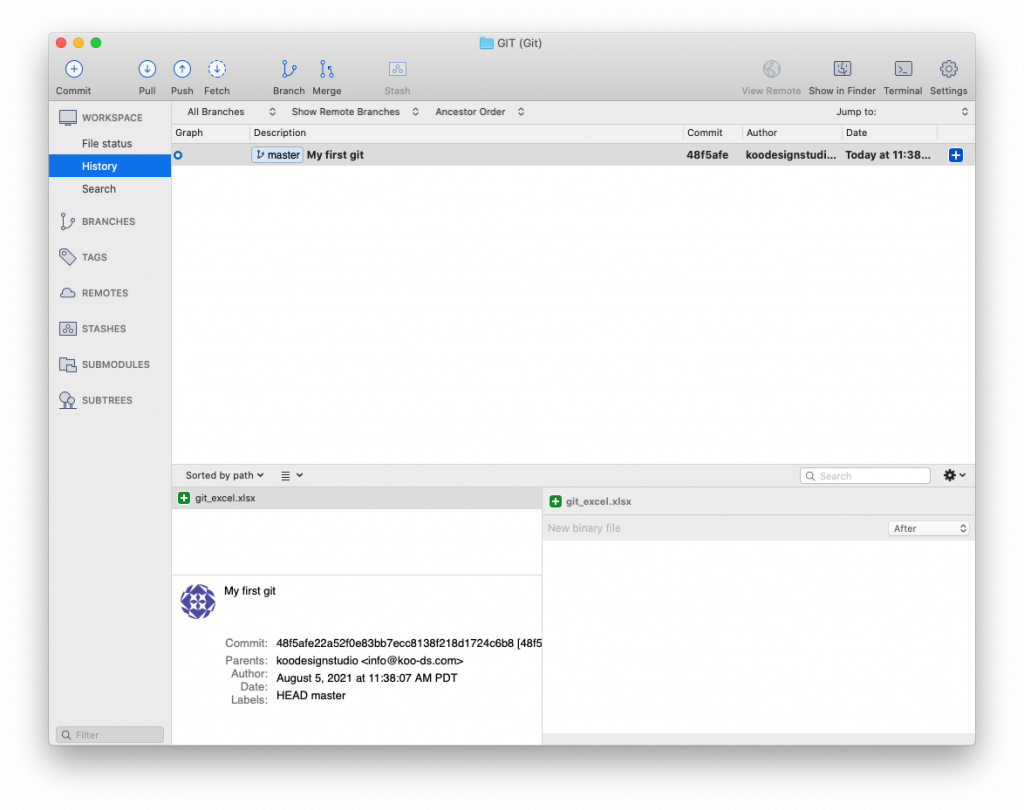
Start a new excel file and just save it, it ‘s automatically appear to the git screen, at the “File status” on the left menu bar under WORKSPACE but it’s not yet in the tracking system, so you have to commit the file.
NOTE: if your file still open ~filename appear, when you close the file, it will be disappeared.
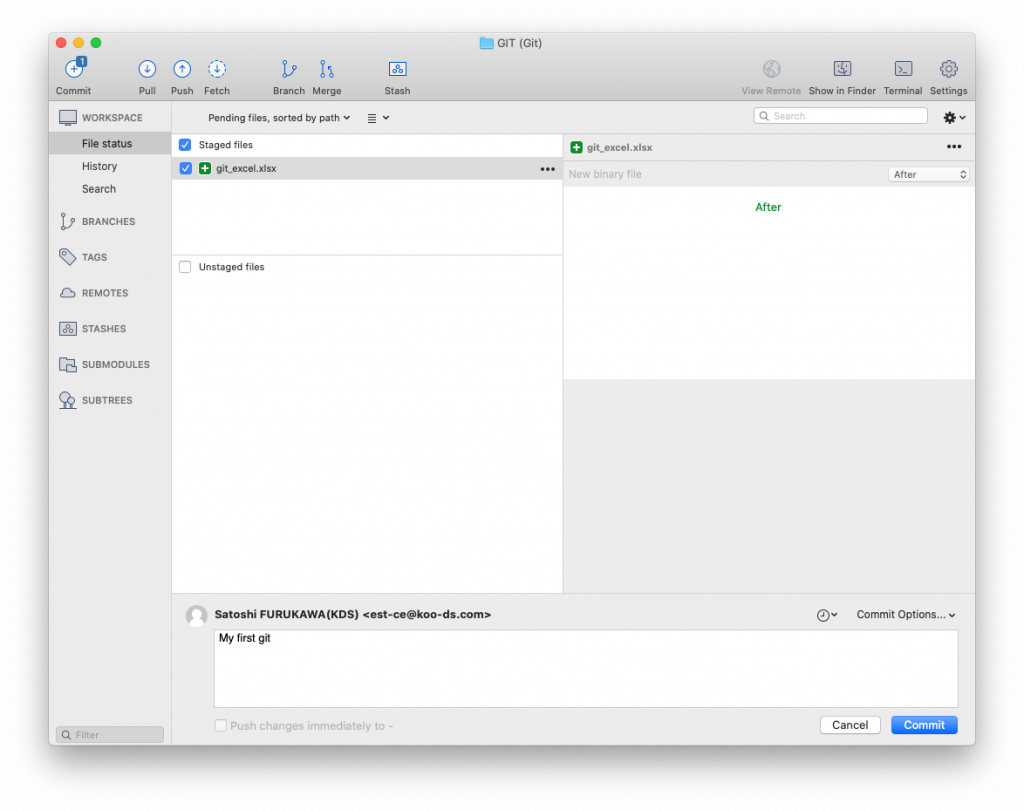
To commit the file, select the file (check the box), it will automatically move to Stage files section and at the bottom “Commit” section, type “my first git commit” or something you can refer later and press [Commit].
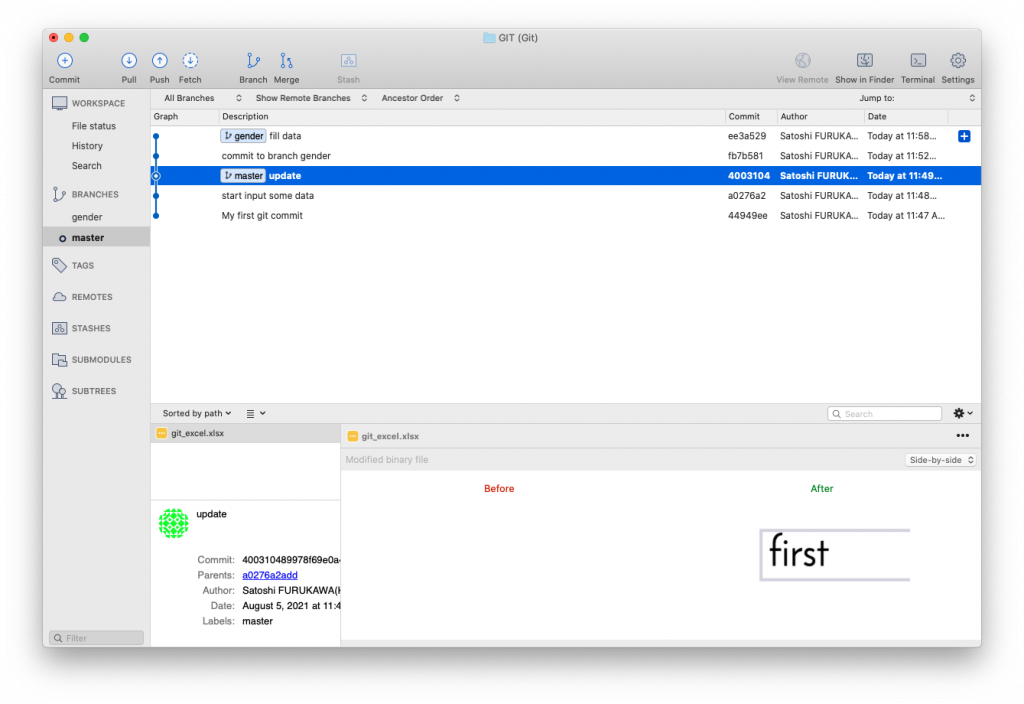
Switch view to “History” at the left menu bar. You see the fie added to the git system. Congratulations! You get started to using git.
git watches all the files contained in the folder, so if you create another file, Word, it also tracked by git. You can work on it and save it and commit to add to the History. Every time you commit, you commit to Master branch.
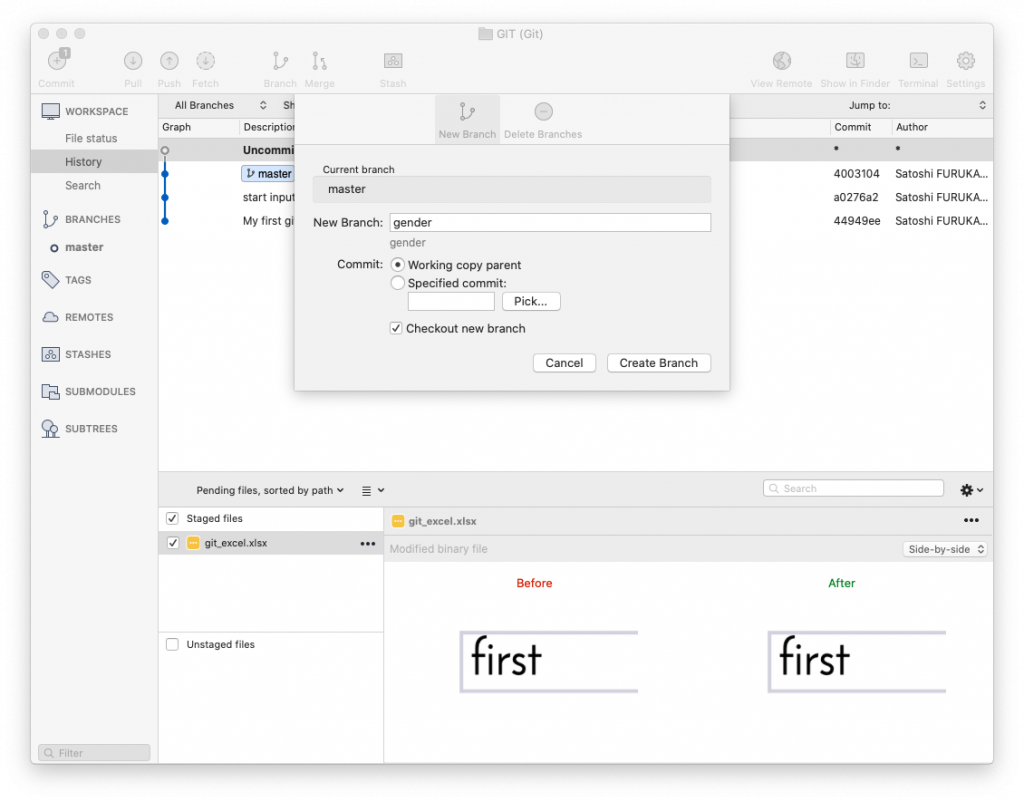
When boss come and divide a column to 2, you can make a branch to keep the original and start new branch to record the new history.
To make a branch, click on “Branch” on the top menu and type name of branch as you like, let’s call it “gender”.
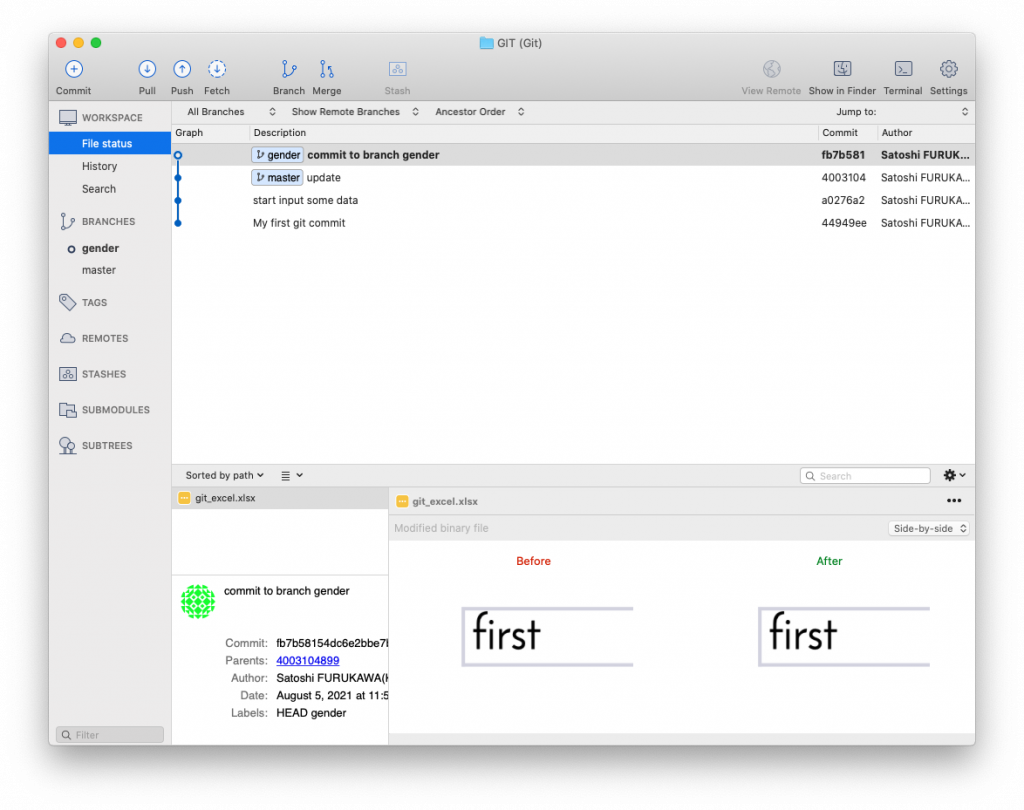
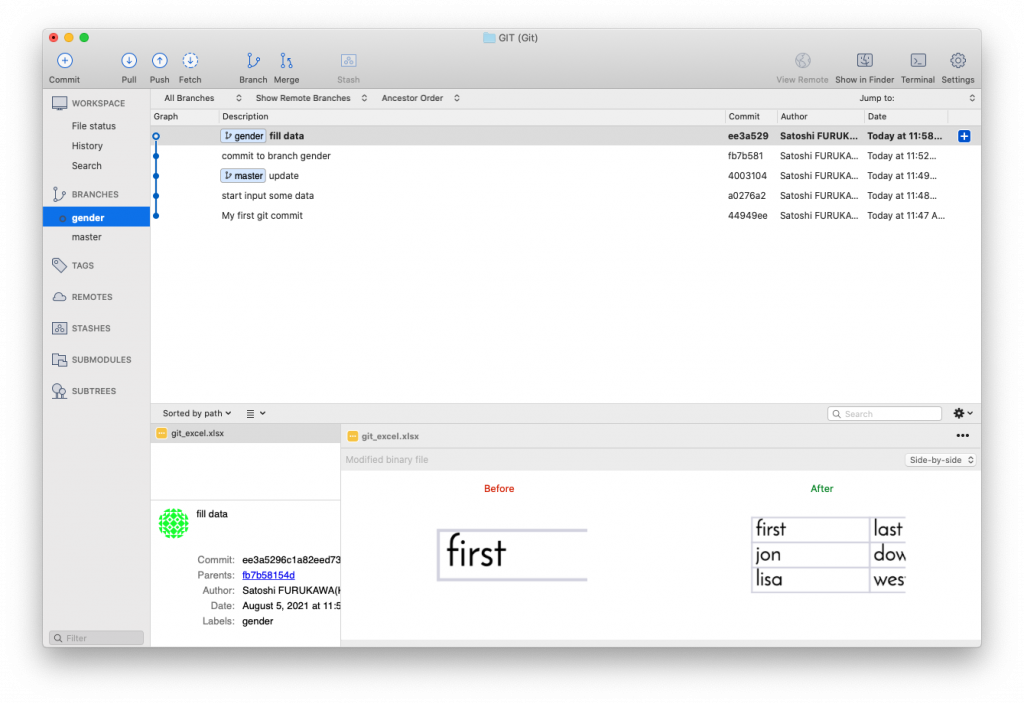
You work on the excel and save it, now you are committing to the new branch “gender”. So the master is untouched as before you committed to the new branch.
Switching (checkout) over 2 branches “Master” and “gender” by clicking BRANCHES at the left bar to see how the files in the folder changes.
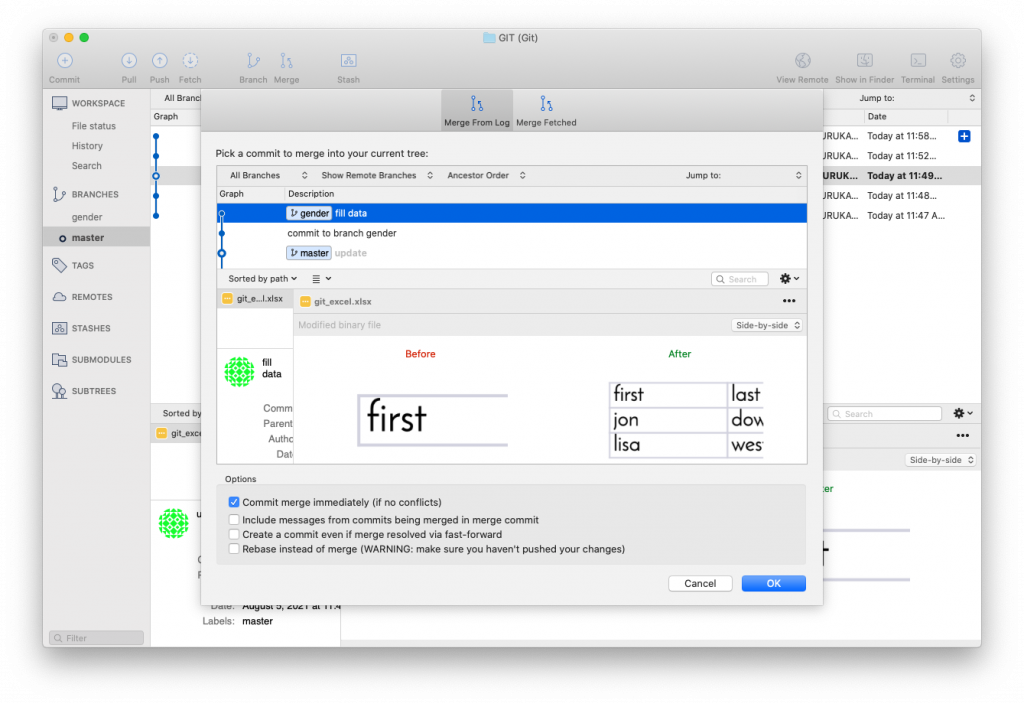
Merge, when you are done with a specific changes such as [gender] column, you can merge the branch together, merge “gender” to “Master” branch
GIT REMOTE
Working with collaborators using git is just amazing, you can work a same file with them at the same time and sync changes when you need to. or share your experiment with them etc..
GitHub is built for a remote git storage, storage called a “repository” in git, share a git repo to the world. You can download (git clone) to your computer (local) whatever uploaded to GitHub as public. And it can be shared ONLY for private too. GitHub has became so popular, maybe that’s why it sounds familiar to you too.
To work with remote git repository using Sourcetree,
First, you have to have a remote git repository, in your own cloud server, GitHub.com etc..
The name of repo has to be the same, so If you started GIT.git in your local, create an empty remote repo as the same name.
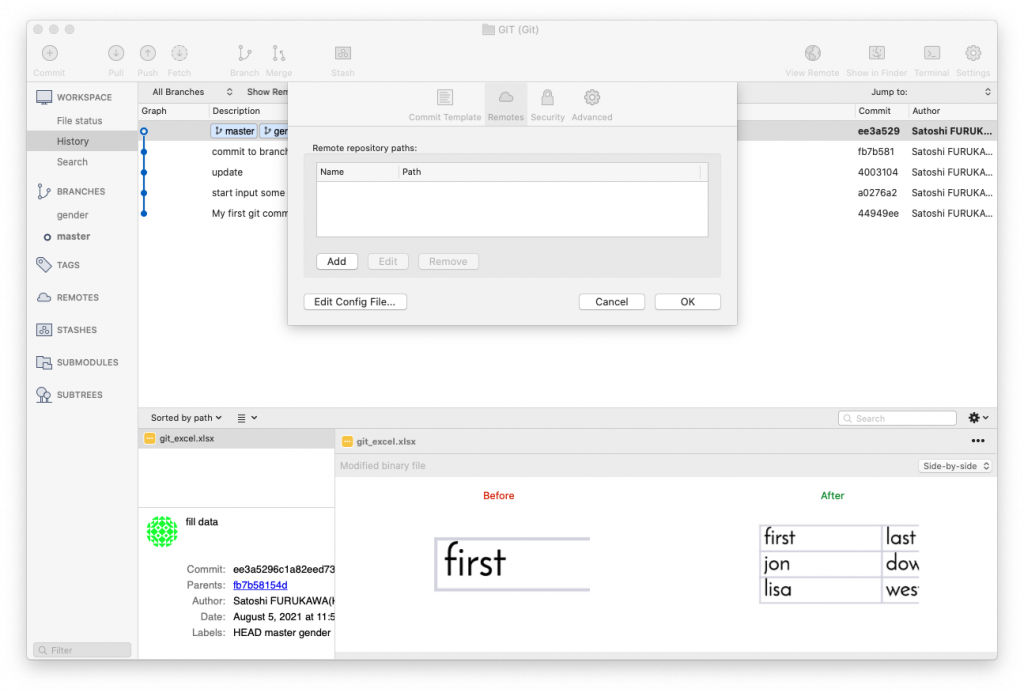
Once you have the remote git repo, click “Setting” from the top right, select to “Remote” tab, [Add] to add a new remote git to store the git.
Type remote git name as “origin‘. Then URL/path “https://koo-ds.com:/data/git/GIT_TEST.git“, where you put the remote repository. If you push to GitHub, the option, select Host Type such as GitHub, Host Root URL will automatically filled as https://github.com, then type your GitHub Username. (when sourcetree try to connect to the remote server, it will ask you to type your username and password.)
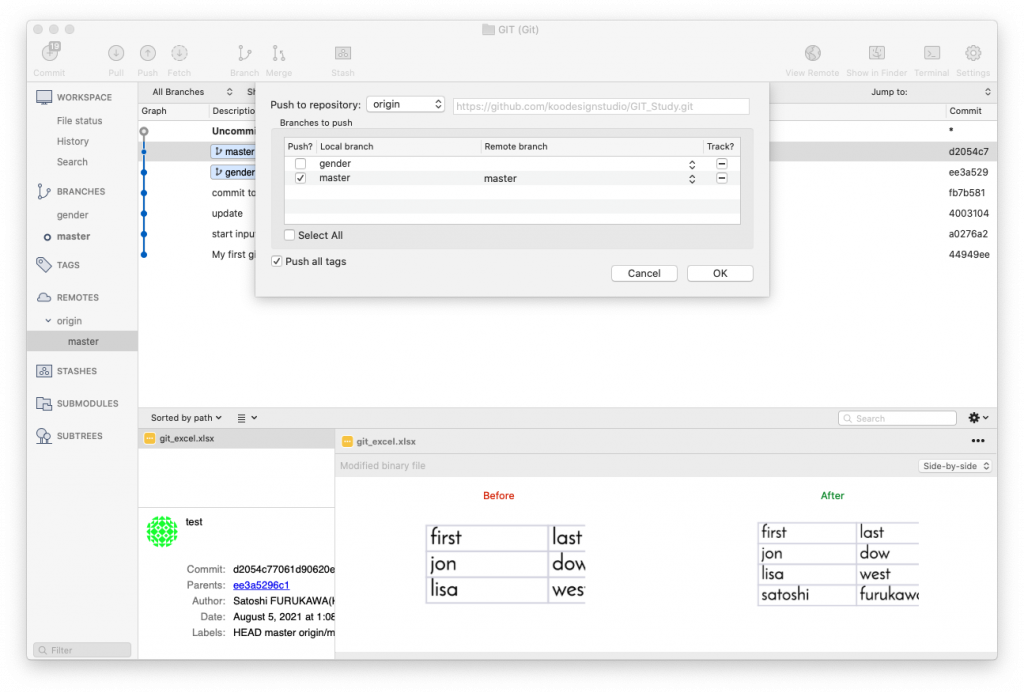
Now you can push your project to remote server, select REMOTES at the left and select your server where you want to access to, Then “Push” at the top bar. You can select what branch you want to upload. Then It will connect and send git data to the remote server. When you are working the project from different computer, start new and “clone” the data from the remote repo, then add all files to your new local git repo and commit, push back to the remote repo, then go back to you original computer and “Pull“ the changes to it. You can work with collaborator remotely do the same.
work => save file => git add all => commit => push THEN pull => work => save => git add all => commit => push =>…
If you are familiar with a command line shell, you can use CLI, here is some command note:
$ cd toProjectFolder
$ git init (make a git in a project folder)
$ git add . (add all the changes to git)
$ git commit -am "My first git" (commit)
$ ssh username@remote_server.com
@ remoteServer $ cd /where/your/gitRepo/willbe/
@ remoteServer $ git init projectName.git --bare
$ git remote add origin usrname@remote_server.com:/where/gitRepo/willbe.git(set a remote git repo, you should create “willbe.git” repo first, it can be just empty git)
$ git push --set-upstream origin master (push to the remote)
$ git branch gender (create a new branch)
$ git checkout gender(switch to the branch)
$ git add . (add saved files to the new git branch)
$ git checkout master (switch back to master)
$ git checkout gender(switch to gender again)
$ git push(you can push a branch to the remote repo too)
$ git checkout master(before you merge, go back to master)
$ git merge gender(merge all the changes you made and committed to gender branch to master)
$ git branch -d gender(delete gender branch)
$ git clone username@remote_server.com:/where/gitRepo/willbe.git (when you use different computer or your collaborator start to work remotely, download all the git project)
koo design studio では、私自身のプロデューサー、監督、編集、アーティスト、また時には俳優としての経験から全てのビデオ制作、コンサルテーション、制作、公開、分析の一連の流れの全ての側面を部分的または全体的にお手伝いしています。もしあなたが既に美しいフッテージを撮影しており編集だけが必要な場合や、ビデオにモーショングラフィックスを追加したい場合、また素晴らしいアイディアがあってもどこから初めて良いかわからない場合、またあなたの計画の予算案が欲しい場合など全てをお手伝いさせていただきます。
from koo design studio newsletter – vol. 37(J) 04/06/2021
MAKING A VIDEO LIKE A PRO!
THIS IS 4TH OF THE SERIES
Some of you might think to make your product/service promotion video by yourself. It’s good idea and fun so let’s do it. In this blog, I’d like to shares some professional tips for you. I hope that will help you to understand the production process and you succeed in your video production.
This is a series of 4 process tips:
Planning (pre-production)
Shooting (production) [This issue]
Editing (post-production)
Analysis (publish to YouTube and analyze the viewer)
Analysis (YouTube and analyze the viewer)
Congratulations! You’ve completed a video. Let’s publish through YouTube
YouTube
Sign in or create your account
YouTube become one of the most succeeded web broadcasting channel internationally without doubt. I recommend to create your channel. Just sign in as your Google account. So if you don’t have one, create one for your business (it can be a personal account too).
Upload a video
Click the video+ icon to upload your video from your computer.
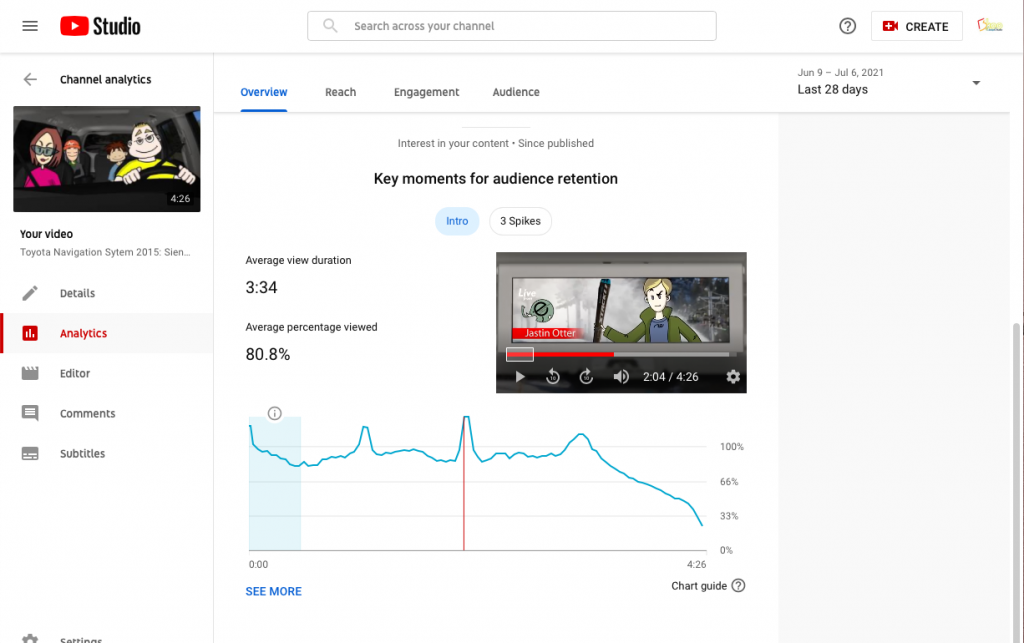
YouTube Studio
Under your account at the top-right, in the pull down menu, you can access your Youtube Studio, where you can analyze your channel analytics, viewer’s behavior for each video you’ve uploaded etc.. it’s a very powerful tool. Especially you can analyze each video’s viewer behavior. So you can re-edit the video accordingly or you can use as a reference to create a new video.
Other sharing sites
vimeo
It’s another great web video output source. You can login with your Facebook, Google, Apple, account or your email+password.
It’s pretty much the same as YouTube. But you need to upgrade to a payed account (Vimeo Plus and Vimeo PRO to use the full feature.
Instagram, Facebook, Twitter, linkedin
It’s slightly different from a video sharing site since it’s considered as a SNS but as long as you can promote your video, why not using it.
A Video is a communication tool, enjoy sharing your video.
koo design studio
I’m offering all aspect of video production, from consultation, production, publish, analyze circle with my long experience of all the process as a producer, director, editor, artist and sometimes as an actor! If you’ve already shot some beautiful footages and need to edit, you want to add some motion graphics to your video, you have a great idea but don’t know where to start, or you have a plan and you need some estimates. These all I can help.
I started making a 8mm film movie when I was 14 with my friends. It was a SF movie inspired by Star Wars episode IV which just came out. Since then I keep making films and videos, it’s been a long career. I’ve experienced many changes and I’m glad that the digital technology change many aspects of film/video making and distributions, at the same time, I miss a lot of things which has gone. The basic process of making a film/video has not much changed, either shooting in real or digitally generate a character, landscape, building etc.. you still need to shoot, you still need to edit and so on. I’m hoping that these tips help improve your production or encourage you to start something new. Probably it’s easy when you get started and if you are having a hard time finishing it, please let me know.
This series, I’ve avoid to describe too much details of each aspects such as how to shoot specific location or how to use an editing software, try to give some general information and tips. If you have any specific question, please feel free to leave a comment.
Today’s LIST OF TOOLS
– Your computer with the internet access
Of course!! If you need a professional consultation or production, Pleasecontact me anytime!!
I’ll give you more detailed advice for your successful production.
NOTE: download is free but you need to create your account first. Also download .dmg
The installation is pretty straightforward. When “Configure MySQL Server”, you MUST CHECK on “Use Legacy Password Encryption” otherwise you’ll screw later with “ERROR 2059 (HY000): Authentication plugin ‘caching_sha2_password’ cannot be loaded: dlopen(/usr/local/Cellar/mysql@5.6/5.6.51/lib/plugin/caching_sha2_password.so, 2): image not found”
make the shell access
echo 'export PATH="$PATH:/usr/local/mysql/bin"' >> ~/.zprofile
source ~/.profile
mysql -u root (or your username) -p
from koo design studio newsletter – vol. 37(J) 04/06/2021
MAKING A VIDEO LIKE A PRO!
THIS IS 3RD OF THE SERIES
Some of you might think to make your product/service promotion video by yourself. It’s good idea and fun so let’s do it. In this blog, I’d like to shares some professional tips for you. I hope that will help you to understand the production process and you succeed in your video production.
This is a series of 4 process tips:
Planning (pre-production)
Shooting (production) [This issue]
Editing (post-production)
Analysis (publish to YouTube and analyze the viewer)
Editing (post-production)
I hope you’ve enjoyed shooting! It’s fun, isn’t it? Now all footages need to be transferred from the SD cards (or smartphones) to your computer.
Premiere Pro, Final Cut Pro, Avid etc.. are fully functioned and made for professionals. I personally like “SHOTCUT” which available for all platforms (Windows, Mac and linux). If you are a Mac user, iMovie is also good choice for sure.
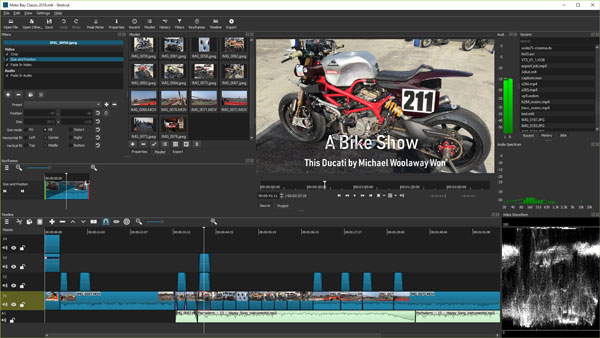
All editing software’s functions are basically pretty much the same, it’s consisted by “Bin (where you footages are stored)”, “Track editor”, “Effect control”, “Main View with audio level”
shortcut screen image
Bin :It stores a footage reference (The actual data are where you placed in the computer, it’s just a references/shortcuts), so you can access a desired footage easily.
Track Editor : Where you bring a footage from bin to edit. It’s layered tracks. (for video, title, sound/ music, transition/effects), The higher the track, the higher the visual priority.
Effect control : You can control scaling and moving a selected footage, add and control audio effects. Also you can control a effect which you’ve added to the track (such as fade in/out, transition, overwrap transition, color correction, footage transparency, sound volume etc…)
Main View + Audio level meter : You can monitor the track editor’s visual and audio.
Let’s Start Editing!
Tell a story
Editing is telling a story. In some cases, it may be more effective to discard the original script, review all the footage you shot, and reconstruct a new story from it.
First of all, I usually watch and check each shot as many times as possible. It is very important to memorize what you have.
Then trim each footage to keep only the sections you need.
After the trimming, roughly place those footage according to the script (if you have two or three alternative takes, arrange these shots vertically) to see if the story works as a video as when you wrote the script. Not pay too much attention to the details at this point, pay attention to telling the story. Reorder the footage or replace it with an alternative take until it works.
Finally tune up all footages (trim more or less, add transitional effects, color collects, adjust audio levels, remove/add noises etc..)
The flow of telling story is very important, so I add a temporary music and follows the rhythm to edit (find a genre of music, rock, jazz, classical etc.. to fit your story). You can find a good royalty-free music online for free or a little of money. (Youtube offers some too)
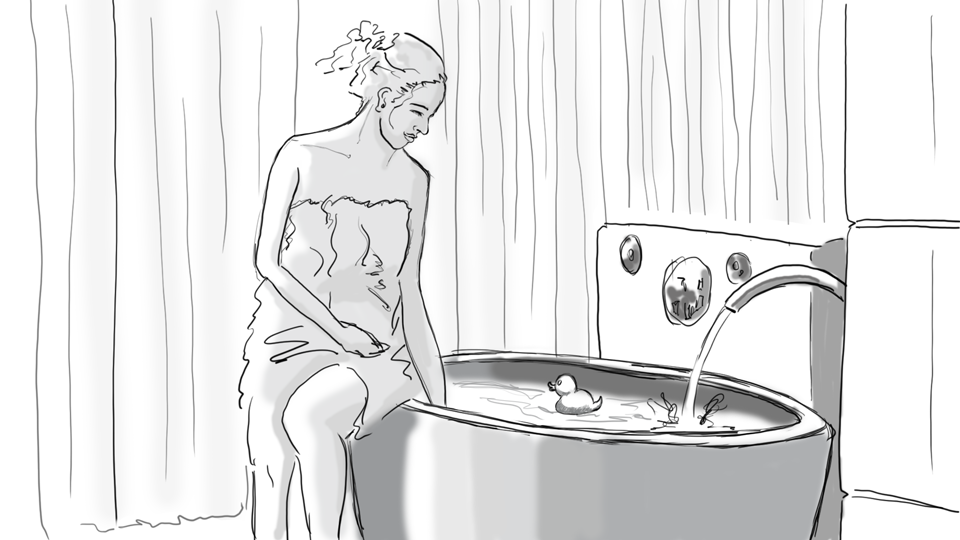
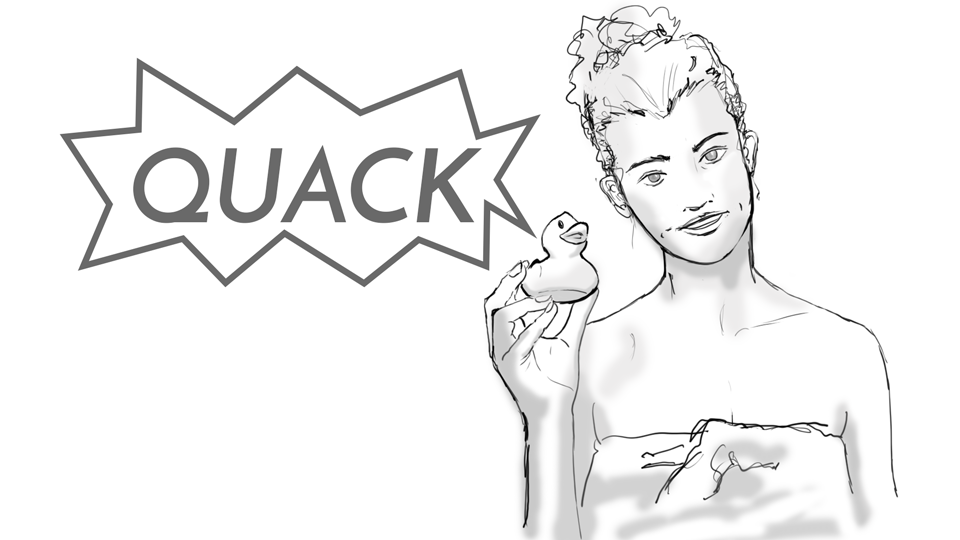
This is an example of how I edit to show a function:
1. Start from the tight shot of main subject: You show what is it.2. 2nd, show all. You can show the relationship of all (the subject, presenter and environment). Which also can emphasize the feature of subject such as scale, color, shape are how to fit to the environment3. 3. Tighter shot of presenter: By showing the close up of presenter’s face, viewer gets more familiar and good impression to the subject.4. Then explain how the function works.
Color correction
It’s good idea to correct the color for all footages once you done the storytelling. Even you shot at only one location where the light setting is the same, the color can be slightly different (especially if you move the camera location). By correcting the color, you can emphasize the subject vividly and alive.
Pay attention to the white and black area for the balance, find a whitest spot in a footage and move the mouse point over there to see RGB balance to find out what color higher then others (R: 244, G 200, B 198 = too much red), then bring the red channel down to make even it even. Do the same as black spot too. This time all value can be close to 0,0,0. If RGB is R255 G255 B255 in larger area, it’s most likely the image is too bright (burned out), so make it slightly darker to adjust a good over all color balance and contrast. Once you did one footage, you can apply the same color correction to the similar footages.
Title/subtitle
Adding a title in the opening will help viewers. Good to add some subtitles to explain and/or emphasize features to the viewer but not too much or too long, always keep it short and simple. Also for the caption, if you need adding some language options and if you’ll post to Youtube. Maybe it’s good to use youtube’s caption system rather hardcode to the video with the editing software. I’ll explain how-to at the next post.
Music and sound effects
A music helps to keep a good tempo for the flow. If you already have a good music, add to the sound track right after your 1st rough cut. A sound effect is also helps the scene and drama very effectively. Keep a good balance with voices and music.
Patience and rhythm are your best friends when it comes to edit
2. SFX
I want to mention just a little about a special effect (SFX, some people call it a visual effect, VFX)
Even you don’t have a SFX specific software like Adobe After Effects, Nuke, Fusion etc.. you still can add some cool effects to your video. For example like making a digital scrapbook. You can masking out your footage only you need very roughly and place on top of an image like a paper textured. Then use a page-curl transition to the next cut.
Explore possibility with something you’ve already familiar with in your daily life, then adapt the idea into the digital creation. Idea comes always first and technology follows.
Today’s LIST OF TOOLS
– Video editing software
– music (royalty-free)
Editing (post-production) is always my favorite section of film making!
Of course!! If you need a professional consultation or production, Pleasecontact me anytime!!
I’ll give you more detailed advice for your successful production.