
Google reCAPTCHA v3 Enterprise

Google reCAPTCHA V3: Enterprise key generation, config and implementation.

Some issues with my website’s contact form,  a robot sent a series of spam emails, the regular V3 only protects the frontend submission,  not direct attack from the backend.

So I have to update to the Enterprise version. I think so far works well and I recommended to update if you haven’t yet.

The process

All Google services have moved to under Google Cloud, so you have to use Google Cloud console to add, config, set up your reCAPTCHA key to frontend and backend.

If you are familiar with Google Cloud, I guess it’s not difficult. But if not, it’s hard to find where to start and where to look for, how to generate keys and others.

Especially the process instruction in the reCAPTCHA key generation page is not all you need to deal with like before. More than you think, more to read doc. more to understand their structure etc.. .

So please follow how I did.

Create a project

Anything you do there, first create a project. If you already done something and have a project, you can use the existing project but I recommend to create a new project for “G-reCAPTCHA”.

https://console.cloud.google.com/

Where to start

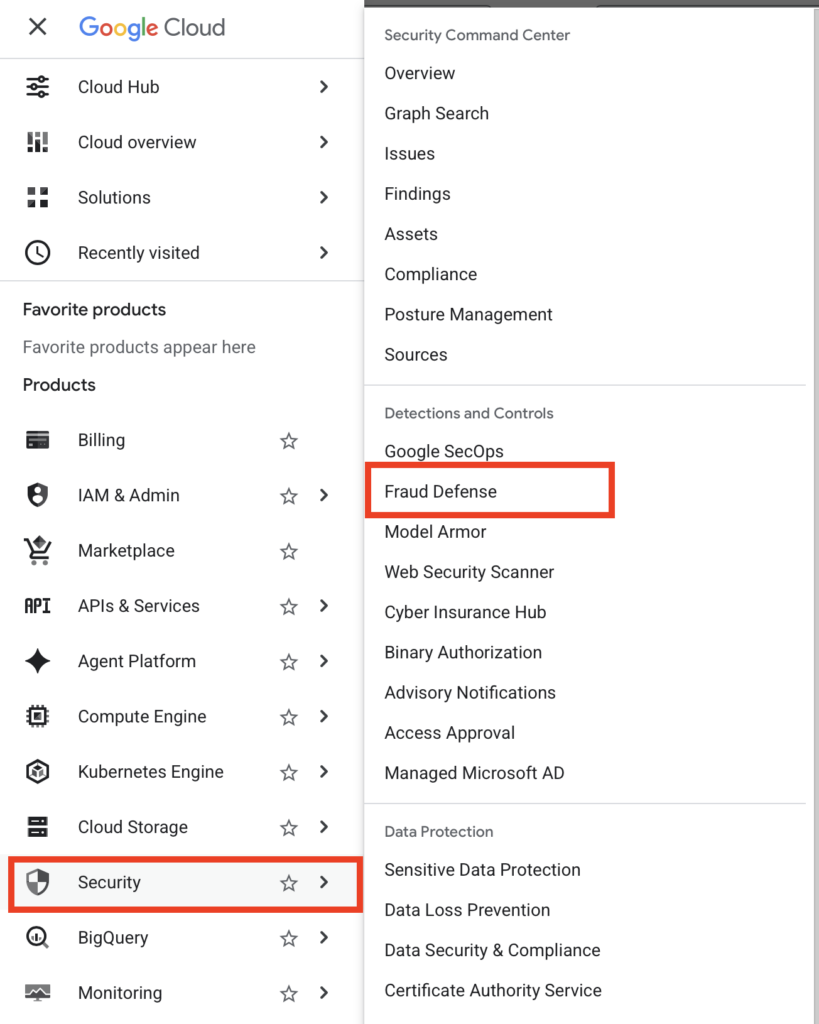
Google reCAPTCHA is located in the “SECURITY” section, under “Fraud Defense”. click that from the top left hamburger menu.

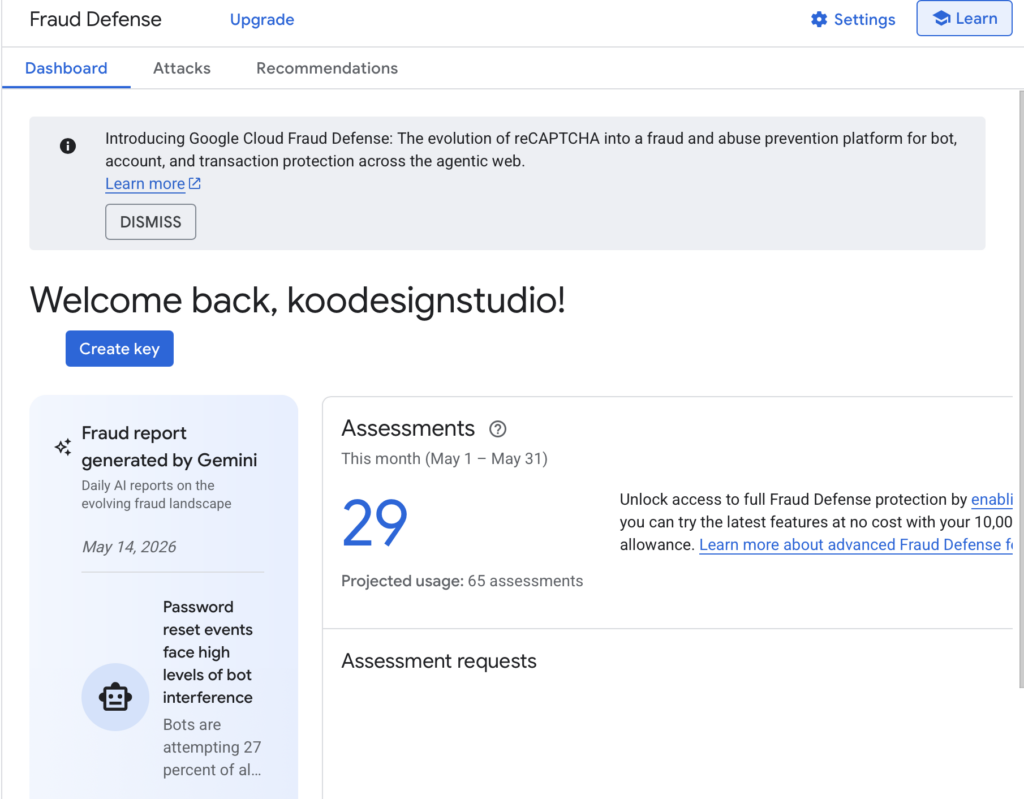
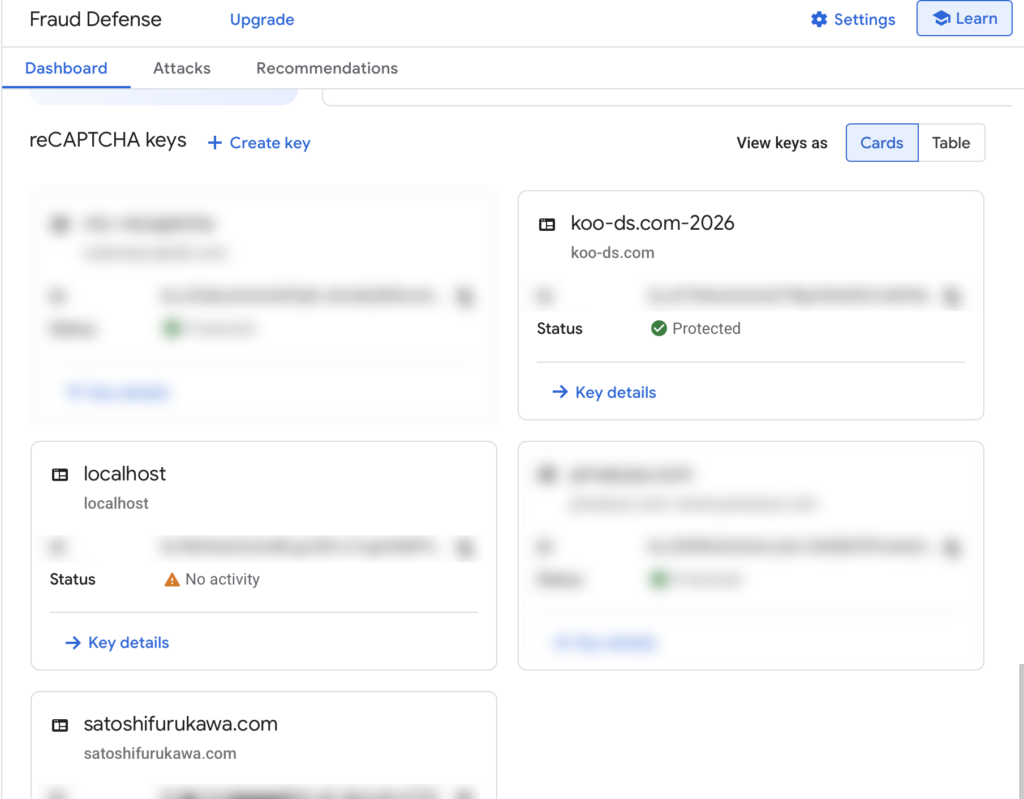
In the Dashboard, if you’ve used some “old” reCAPTCHA, you can find the keys there too in the list below.

I decide to start from creating a new key for my website.

NOTE: When you create a new key, it will automatically create a  “Essential” plan. And t’s “Free up to 10,000 assessments/month”. It’s good for my kind of business since I don’t expect so many access. But if you run an eCommerce site, maybe consider to update. You can check and update the plans in the “Attacks” tab.

+ Create Key

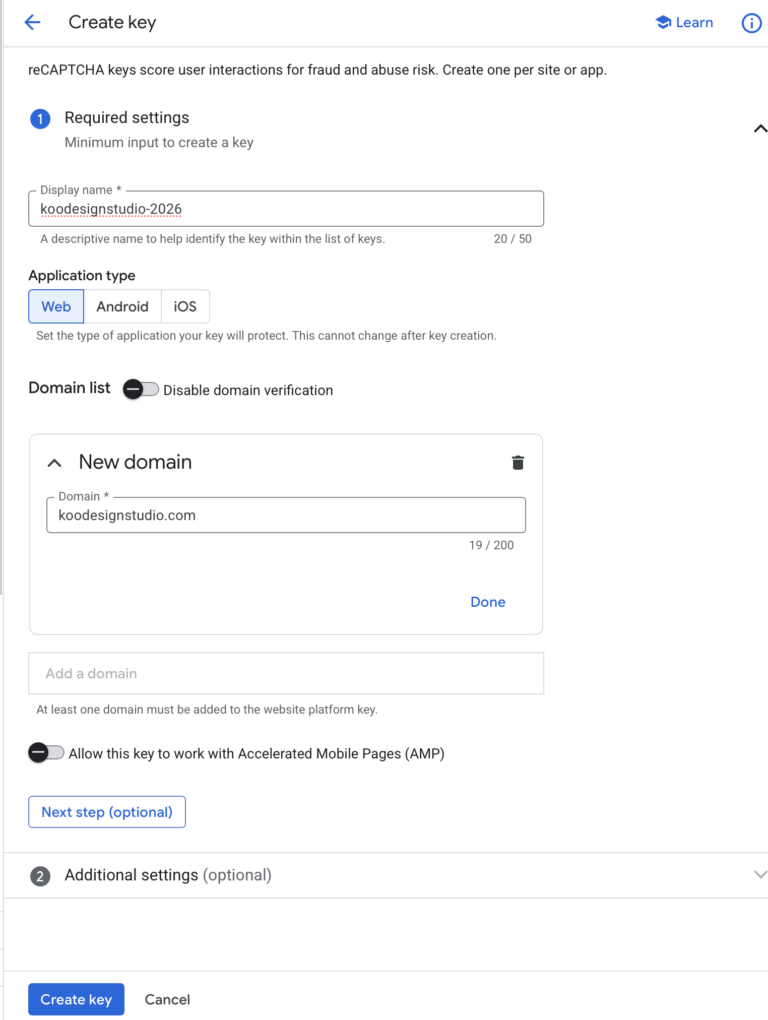
Click to + Create key.
Fill:

  1. [Display name (like a site name)],
  2. select Application  type [Web|Android|iOS]
  3. and [Add domain](that’s the site to use the reCAPTCHA)
  4. then [Create Key]


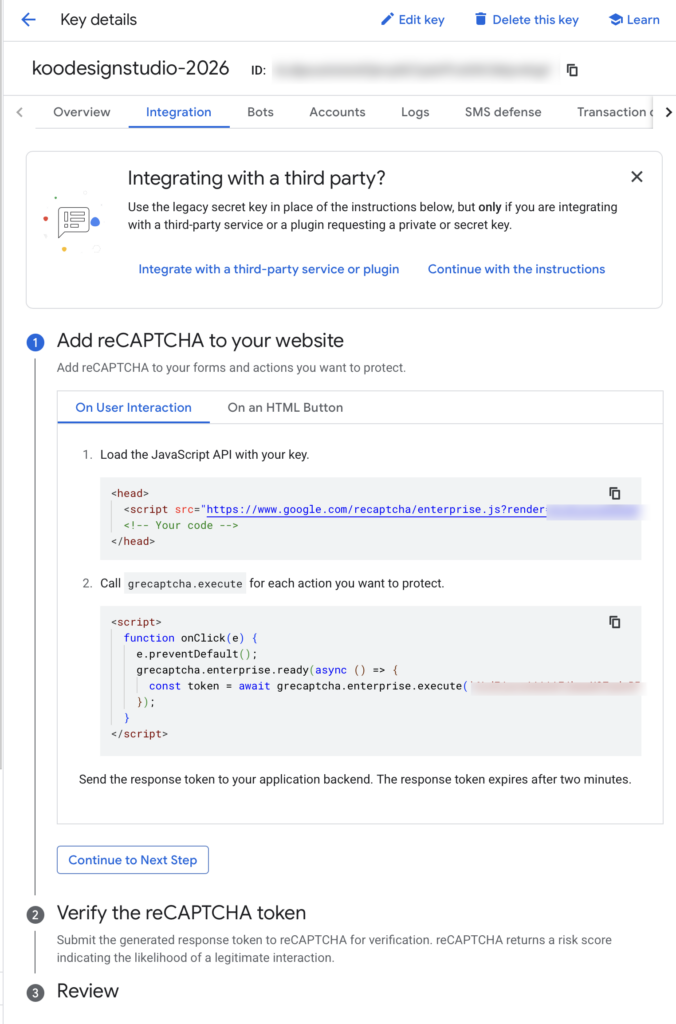
Follow the ① Frontend and ② Backend setups in the “Integration” tab
Easy!

NO!!!! It’s not that simple.
More steps are hidden.

But for now, you created a reCAPTCHA key successfully anyway.

Frontend


Following the “integration”
instruction.
At the top of your web site such as index.html, inside < head> </head> tag,
add the line:

This is simple.
Don’t forget to replace the Site KEY, in the line after:
enterprise.js?render=

<script> 
    src="https://www.google.com/recaptcha/enterprise.js?render=your-site-key">
</script>

Then, for the form submission, add:

<script> 
    function onClick(e) {
        e.preventDefault();
        grecaptcha.enterprise.ready(async () => {
        const token = await grecaptcha.enterprise.execute('your-site-key (ID)', {action: 'LOGIN'});
});
}
</script>

My example here, vuejs composition-API

try {
    const token = await new Promise((resolve, reject) => {
      if (typeof grecaptcha === 'undefined' || !grecaptcha.enterprise) {
        reject(new Error('reCAPTCHA library not loaded. Check if script is blocked.'));
        return;
      }

      grecaptcha.enterprise.ready(function() {
        grecaptcha.enterprise.execute('your-key', { 
          action: 'contact' 
        })
        .then(resolve)
        .catch(reject);
      });
    });

    const payload = {
      email: user.value.email,
      name: user.value.name,

      recaptchaToken: token
    };

    const response = await axios.post(variables.DBP, payload);
    console.log('Success:', response.data);
    
    initForm();
    thankYou.value = true;
  } catch (err) {
    console.error('Submit error:', err);
    alert(`Submission failed: ${err.message}`);
  } finally {
    loading.value = false;
  }
};
e;
  }
};

Backend - (tricky)


To adding code the backend server.
I use Node.js Express server.

actually it took me long…
It wasn’t clear, easy to find out this

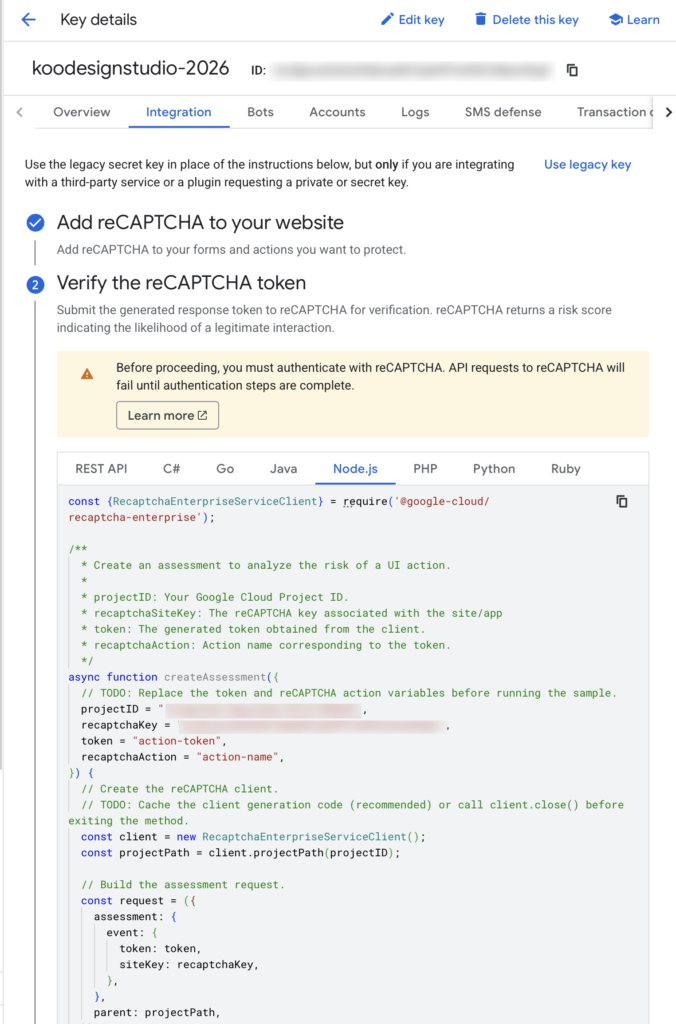
Before proceeding, you must authenticate with reCAPTCHA. API requests to reCAPTCHA will fail until authentication steps are complete.

Learn More

click [Learn More] to get how to “authenticate”, but it’s pretty complex, at least to me….
but Anyway, First you need to generate a json file for the backend.

Generate a json file for the backend

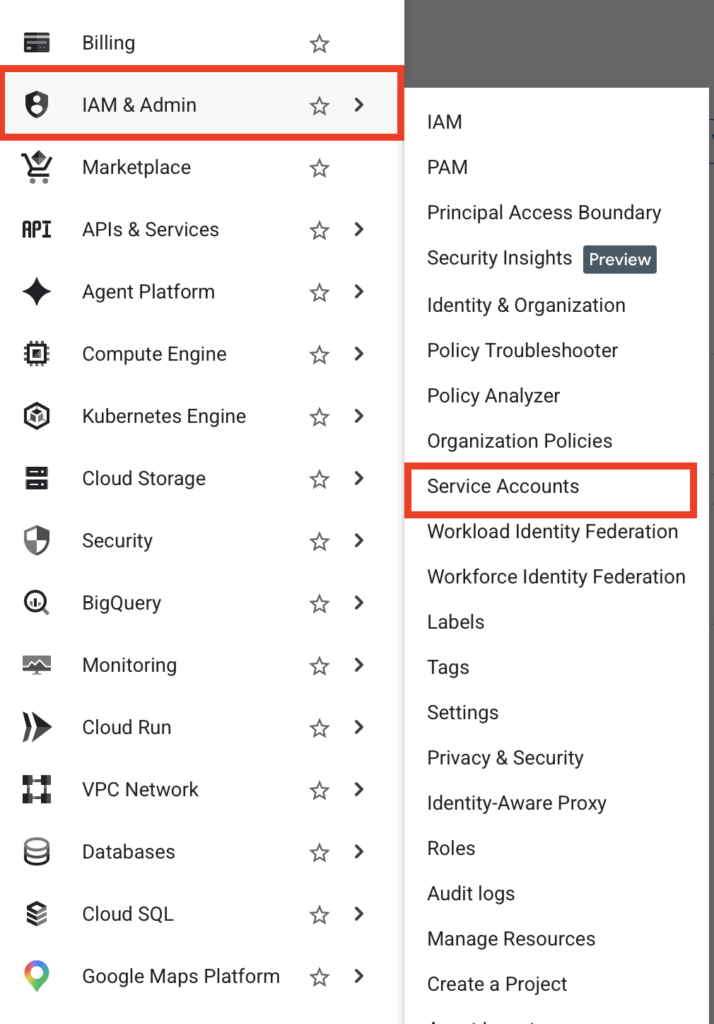
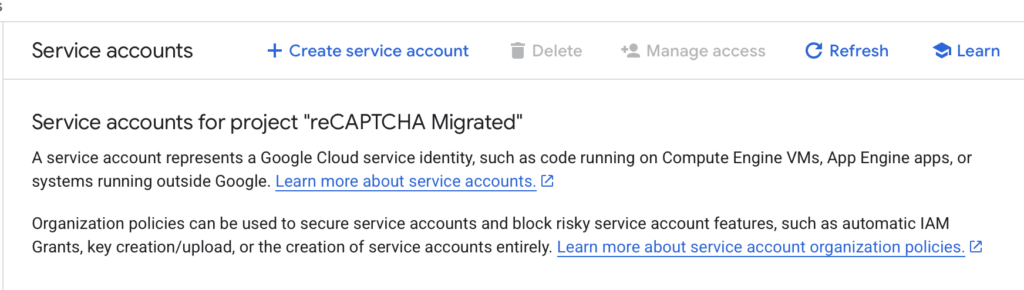
  1. go to the left top, hamburger menu [IAM & Admin > Service Accounts]
  2. on the top, click [+ Create]
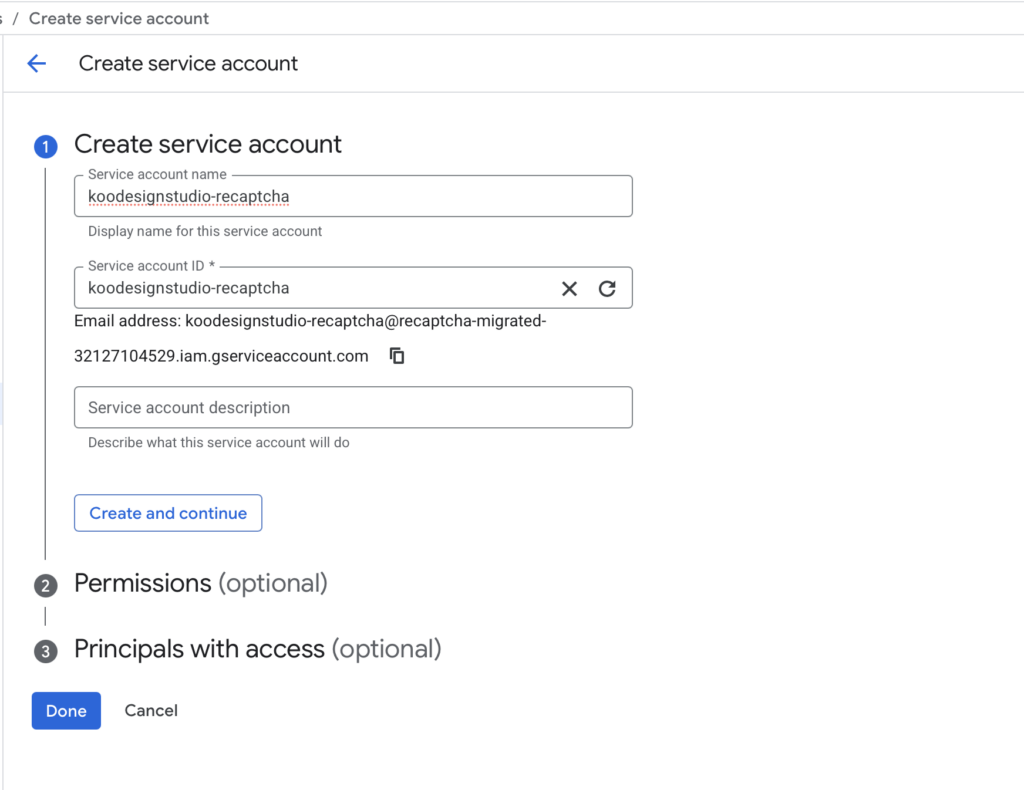
  3. service account
  4. Create service account
  5. service account
    • name = recaptcha-service
    • service account ID will automatically created
    • sercice account description = google recaptcha
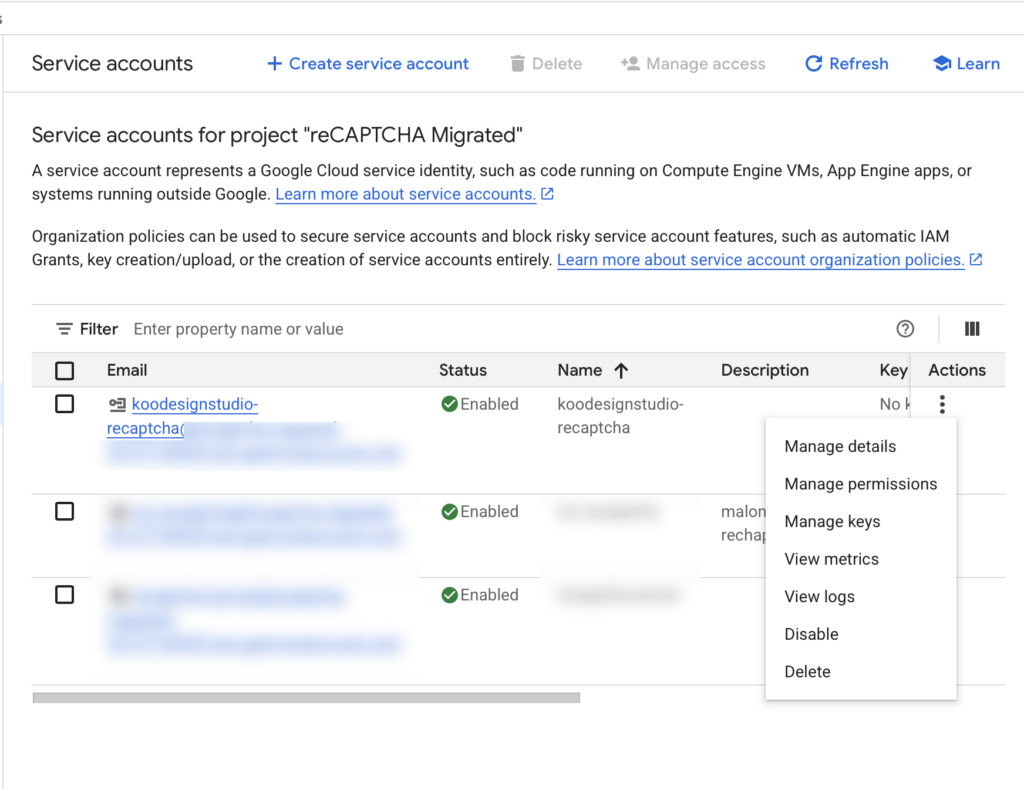
  6. Once created it, go to [Actions] (three vertical dots)
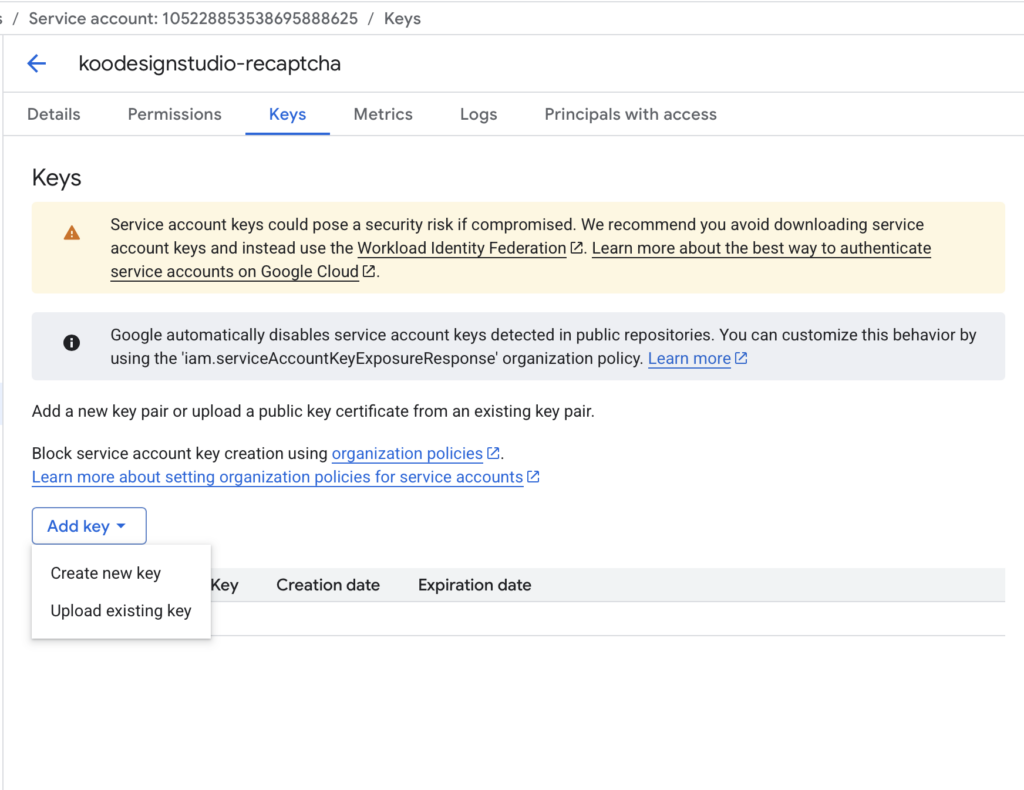
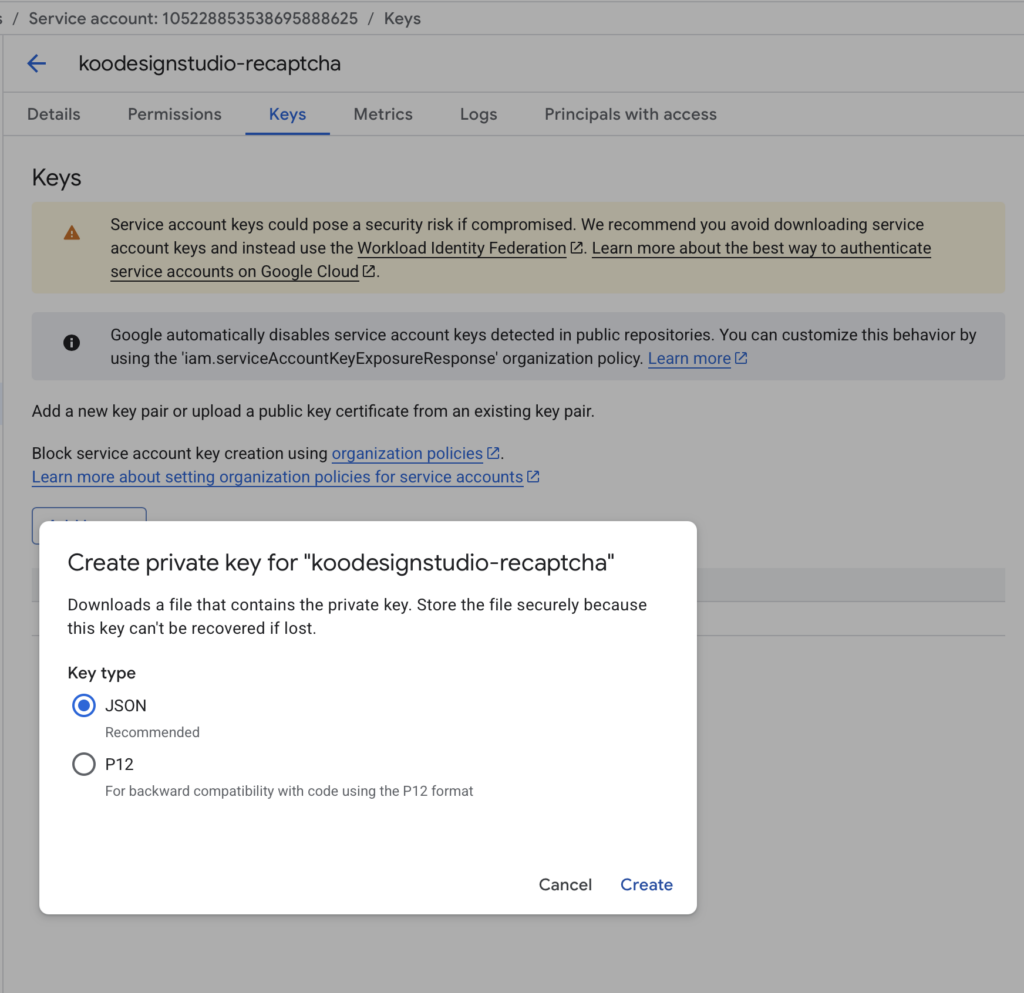
    [Add key] > create new key > JSON
    it will generate a key and download to your computer automatically.
  7. You can find the file something like “recpatcha26-xxxxx-xxxxx.json” in your download folder


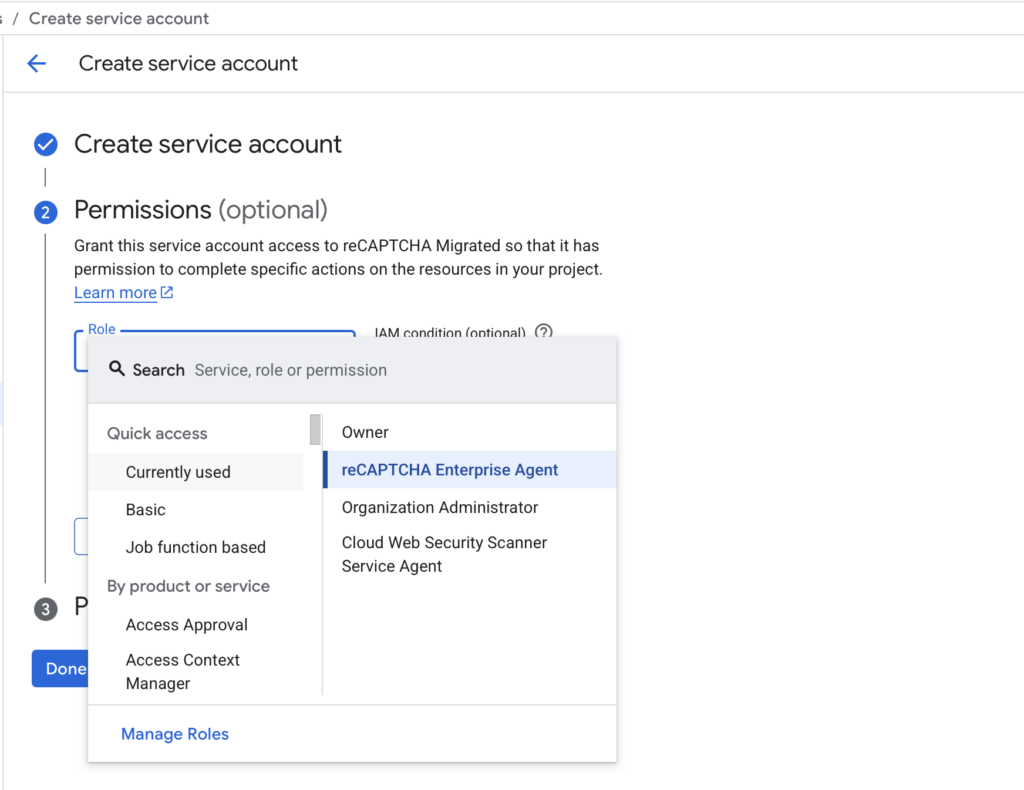
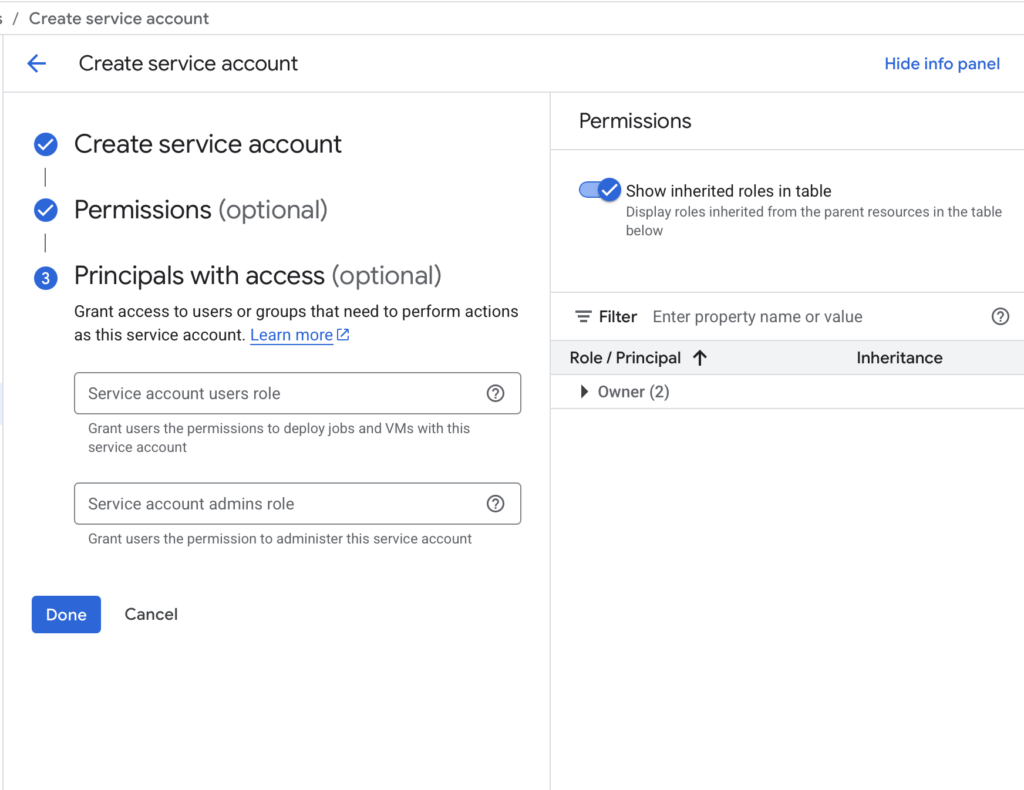
This process ② Permission (option) is important. Don’t forget to select “reCAPTCHA Enterprise Agent”

I didn’t first time because it says (option)… and when tested my server I got 500 error.
So it’s better to config when create a service account.


Once you’ve done creating the account, you can find in the list with newly created Email.

Select Manage Keys from Actions ⠇

Then [Add key] > [Create new ley]

Select JSON

Once you are successfully get and download the json file. Then upload it to the same directory where the server.js (node server app) located. (Actually you can place anywhere in the server although it’s easier to configure the path)

Configure the server script (Node.js)


After uploading the json file, yourProjectName-xxxxxxx-xxxxx.json

You need to install @google-cloud/recaptcha-enterprise package.


In your IPS cloud server where your express server (server.js) is, (mine is Linux Ubuntu) type:

npm i @google-cloud/recaptcha-enterprise

and to configure the server.js adding lines below:

const {RecaptchaEnterpriseServiceClient} = require('@google-cloud/recaptcha-enterprise');
const recaptchaClient = new RecaptchaEnterpriseServiceClient({
  keyFilename: "/path/To/your/projectName-xxxxx-xxxx.json"
});

My sample code for app.post:

app.post('/contact', async (req, res) => {
  const token = req.body.recaptchaToken; // send this from the client
  if (!token) {
    return res.status(400).send
    ({ error: 'Missing recaptcha token' })
  };

  try {
    const request = {
      parent: `projects/${'yourProjectName'}`,
      assessment: {
        event: {
          token,
          siteKey: 'YourReCAPTCHAkey-same-as-theFrontend'
        },
      },
    };
    
    const [assessment] = 
      await recaptchaClient.createAssessment(request);

    if (!assessment.tokenProperties || !assessment.tokenProperties.valid) {
      return res.status(403).send({ error: 'Invalid reCAPTCHA token' });
    }

    const score = assessment.riskAnalysis?.score ?? 0;
    if (score < 0.5) return res.status(403).send({ error: 'Low reCAPTCHA score', score });

    const transporter = nodemailer.createTransport({ 
      host: "smtp.yourMailService.com",
      port: 587,
      auth: {
        user: "yourUserName",
        pass: "YourPassword"
      },
     });

    const mailOptions = {
      from: 'info@koo-ds.com',
      subject: `Message from ${req.body.email}`,
      html: `
        <h1>Message from ${req.body.name}</h1>

        Email:${req.body.email}
      `, 
    };

    await transporter.sendMail(mailOptions);
    return res.send({ message: 'Success' });

  } catch (err) {
    console.error('reCAPTCHA verification error:', err);
    return res.status(500).send({ error: 'reCAPTCHA verification failed' });
  }
});

Please refer https://koo-ds.com/contactHow for Node Express Server development.

TODO:  

in console.cloud.googe.com

  1. Create a new project 
  2. get reCAPTCHA key
  3. Add it to the frontend <head>
  4. configure your sending script
  5. back to google cloud to create Service Account and get .json file
  6. upload the json to the production server
  7. configure server.js adding lines for reCAPTCHA
  8. make sure the path to .json file is correct
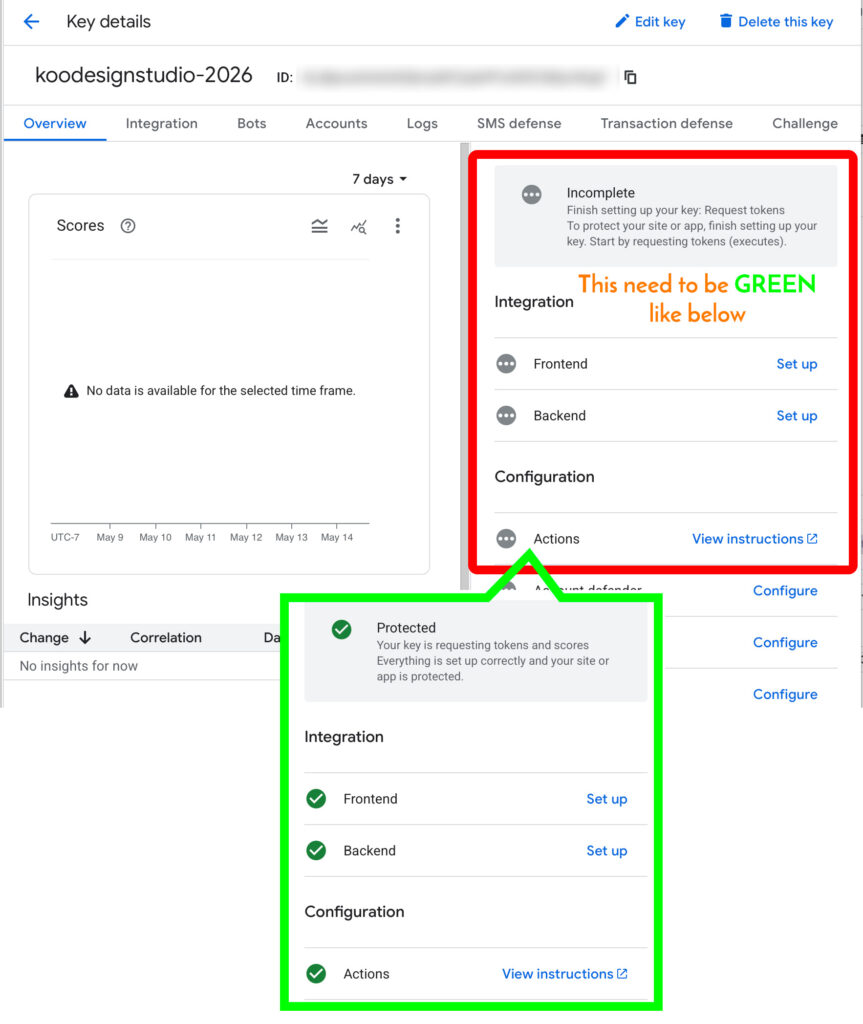
  9. test if now error, means you get inquire email from the site form. Back to Google Cloud to check the reCAPTCHA is “Protected”. Frontend and backend integrated.

Then you will see the activities.

GOOD LUCK!!

Raspberry PI ZERO WH- Hotspot

Raspberry PI (RasPi) Zero WH turn to WiFi HotSpot

My purpose is to connect a RasPi 0 WH through a WiFi network without router. Make it a DHCP server adding a static IP.

So I can access to it by selecting a WiFi hotspot and then through a web browser to control by a Python HTML sever program (such as Flask)

IMPORTANT: to avoid conflicts with connecting an existing WiFi setup such as a home network which controlled by “NetworkManager.” Turn NetworkManager OFF by editing “/etc/NetworkManager/NetworkManage.conf.

Add below:

[keyfile]
unmanaged-devices=interface-name:wlan0

So no network connection to start from, which means obviously you cannot remotely “ssh” to the RasPi. All configuration has to do within  the RasPi OS GUI with a monitor, mouse and keyboard to open a shell. Then access to the configured WiFi hotspot so you can ssh etc.

NOTE: It looks like you can set up “sudo raspi-config”.
System Options > Wireless LAN > Create hotspot.
But It didn’t work for me. I don’t know why.
Also using GUI (right top corner with WiFi mark) didn’t work neither…

  1. Instead of using an Old method “Ad-hoc (IBSS), I configured using Access Point (AP) mode.
    It requires to install 2 packages “hostapd” (WiFi AP) and “dnsmasq” (DHCP server).

sudo apt install hostapd dnsmasq

  1. Give a static IP

sudo nano /etc/dhcpd.conf

add lines at the bottom, 192.168.4.1 (whatever after 192.168)

interface wlan0
static ip_address=192.168.4.1/24
nohook wha_supplicant

  1. Configure “hostapd”

sudo nano /etc/hostapd/hostapd.conf

add lines at the bottom

interface=wlan0
driver=nl80211
ssid=MyPiNetwork
hw_mode=g
channel=6
wmm_enabled=0

auth_algs=1
wpa=2
wpa_passphrase=strongpassword123
wpa_key_mgmt=WPA-PSK
rsn_pairwise=CCMP

Then link config:

sudo nano /etc/default/hostapd

DAEMON_CONF=”/etc/hostapd/hostapd.conf”

  1. Configure DHCP (dnsmaq)

first backup the original:

sudo cp /etc/dnsmasq.conf /etc/dnsmasq.conf.bak

edit cdnsmasq.comf, add line at the bottom

interface=wlan0
dhcp-range=192.168.4.10,192.168.4.100,255.255.255.0,24h

  1. Enable and start

sudo systemctl unmask hostapd
sudo systemctl enable hostapd
sudo systemctl enable dnsmasq
sudo reboot

  • Check the status

ip a show wlan0

sudo systemctl status hostapd

  • Restart NetworkManager

sudo systemctl restart NetworkManager

  • Restart hostapd

sudo systemctl restart NetworkManager

  • Alternative: nmcli

Create hotspot with:

nmcli dev wifi hotspot ifname wlan0 ssid PiHotspot password YourPassword

lock it down:

nmcli connection modify Hotspot connection.autoconnect yes
nmcli connection modify Hotspot connection.autoconnect-priority 100

Disable existing WiFi connection if you have it on:

nmcli connection show

nmcli connection modify “YourWiFiName” connection.autoconnect no

Now finally you can select “YourWiFiName” from your computer or mobile device.

The PasPi provides a IP address when the connection is established.

NOTE: You cannot access to the internet since it’s just a closed network.

Maya Arnold | DOF

To automatically calculate distance between a camera and target locator.

  1. Create > Measure Tools > distance Tool. Select center of camera and where the target locator will be
  2. Since render with Arnold, it need to connect to CameraShape1 + Arnold Focus Distance. NOTE: It’s Not Maya default [Depth of Field > Focus Distance]
  3. MEL Command line is

connectAttr -f distanceDimension1.distance cameraShape1.aiFocusDistance;

Now as you move either the target or camera, automatically calculate the focus distance for DOF! Just adjust Aperture Size.

ffmpeg

convert mov to mp4

ffmpeg -i aaa.mov aaa.mp4

combine mp4 and srt

ffmpeg -i aaa.mp4 -i aaa.srt -c copy -c:s mov_text aaa-CAPTION.mp4

WordPress update

for migrating Ubuntu22, php8.1, I’ve updated my blog (wordpress) too.

  1. Simply download the latest WordPress (6.3.1) and place in a server designated area (ie. /var/www/wordpress) and chown www-data:www-data -R /var/www/wordpress
  2. in the mysql database, create a database named ‘wordpress
  3. adjust php-fpm and nginx max_upload_file_size, if you want to upload .sql file using phpmyadmin. then create a database named ‘wordpress-yourdata
  4. import the SQL file, so all the previous data is migrated.
  5. go to ‘wordpress’ folder, edit ‘wp-config.php
  6. create nginx conf file for the blog (ie. blog.koodesignstudio.com.conf)
  7. restart nginx (dont’ forget “sudo nginx -t
  8. certbot to the blog.koodesignstudio.com
  9. access with a browser
  10. initial configuration for the new wordpress
  11. start from a brand new plain wordpress,
  12. update ‘wp-config.php‘ database to ‘wordpress-yourdata‘, now all the data is coming from the previous database
  13. copy images from the previous wordpress ./wordpress/wp-content/uploads
  14. install the theme and plug-ins as same as the previous
  15. done!

!IMPORTANT even to migrate from another server, frist create a default ‘wordpress’ dabase, then change ‘wp-config.php’

nextcloud

owncloud stop supporting php8. So I decided to move on to next. nextcloud!

I’ve been upgrading ubuntu18 to 22. It’s a pretty big jump, so many major upgrade required. And since owncloud I’ve been using no longer support PHP8, so decided to search alternative.

This is great how-to article: https://www.linuxbabe.com/ubuntu/install-nextcloud-ubuntu-22-04-nginx-postgresql

basically follow the instruction above and good to go except I use mysql instead.

I’ve already installed phpMyAdmin so I use to create a database for nextcloud (as ‘nextcloud’) and be able to use with my account, not root. then change the entire nextcloud folder to sudo chown www-data:www-data

run certbot to make ssl enable.

then access to the nextcloud, using the GUI to set up my account.

then download the desktop app to my mac, install, configure to sync the cloud folder <> mac local.

the sync speed is pretty fast. I’m impressed but it’s been more than 7 years I’ve used the owncloud, it’s good to be updated.

Vue 2 add gtag for GA4

This is for vue 2

First: install ‘vue-gtag’ . this should be Ver 1. And it works with GA4 too.

IMPORTANT: add @legacy

npm install vue-gtag@legacy

Second: Update main.js

NOTE: use “vue-router” to automatically log “pages”

import Vue from "vue";
import App from "./App.vue";
import router from "./router";

// vue-gtag
import VueGtag from 'vue-gtag'
Vue.use(VueGtag, {
  config: {
    id: 'G-xxxxxxxxx'
  }
}, router)

new Vue({
  router,
  render: (h) => h(App),
}).$mount("#app");

DONE!

Certbot

Generate a certificate for nginx

$ sudo certbot --nginx
$ sudo certbot --nginx -d example.com

List all the certificates

$ sudo certbot certificates

NOTE: check each nginx conf files updated by Certbot

Delete a specific certificate

$ sudo certbot delete --cert-name example.com

EXPAND, add a new domain to existing certificate

$ sudo certbot certonly --expand --cert-name existingdomain -d existingdomain.com,www.existingdomain.com,new.existingdomain.com

ADDITIONAL info added 10/09/2024

In case, accidentally deleted a certificate, here how to fix.

sudo certbot certonly --standalone -d deletedDomainname.com

Since still nginx.conf contain information about the deleted certificate, it need reissue certificate ONLY = certonly flag to avoide nginx error such as:

nginx: [emerg] cannot load certificate "/etc/letsencrypt/live/domainname.com/fullchain.pem": BIO_new_file() failed (SSL: error:80000002:system library::No such file or directory:calling fopen(/etc/letsencrypt/live/domainname.com/fullchain.pem, r) error:10000080:BIO routines::no such file)
nginx: configuration file /etc/nginx/nginx.conf test failed

koo design studio ニュースレター vol. 53 – 08/05/2022

こんにちは、koo design studio です。 ロサンゼルスのサウスベイエリアの外は潮風が吹いていて快適です。みなさん、良い夏をお過ごしください。
ところで、私はちょうどウェブフロントエンド制作を Manhattan Beach, CA. BeachCoders Academyの教え始めました。 興味がある場合は、https://beachcoders.comを確認してください

Tech tich-tach Share

Production | Who does what? (1)

他のビジネスと同様に、制作プロセスは多くの面で非常に良く似ています。 マルチメディア制作現場では誰がどのような機能を担っているのかを共有したいと思います。

プロデューサー

階層のトップ。特に財政と予算の面、最終の流通を含むすべての制作とその作品に責任があります。そして、監督、脚本家など、各役割の責任者を選んで割り当てます。

ディレクター

ストーリーテリングの達人。すべての制作を担当するディレクターであり、予算と期日内に作品を完成させます。また、撮影監督、キャスティングディレクター、サウンドエンジニア、制作コーディネーター、ロケーションマネージャー、映画編集者、vfx技術者等を選択して割り当てます。 

撮影監督

責任を持って画質を管理します。 光、影そして色。<br>撮影監督は、照明技術者、グリップ、ドリーなどを割り当てます。ほとんどの場合、フレーミングの決定はディレクターによって行われます。

音響録音エンジニア

音声を録音する責任があります。また、予期せぬ不要な音が聞こえた場合は、直ちに撮影を中止する権利があります。

制作コーディネーター

制作における人(クルーとキャスト)やその他の要件に責任を持ちます。

ロケーションコーディネーター

撮影場所を担当します。 適切な場所を見つけて、許可を取得します。

スタジオ/セットコーディネーター

サウンドステージを担当し、セットを構築します。

メイクとヘアアーティスト

俳優のメイクや髪の毛を担当します。

コスチューム、ワードローブ、小道具

デザインと準備を担当するデザイナー。

VFX/SFXコーディネーター

VFX/SFXを担当します。

編集者

映画/ビデオの編集を担当します。

作曲家およびサウンド/オーディオエディター

音楽、オーディオ、効果音を担当します。

俳優

そしてもちろん、もっといろいろな人達!

プロダクションのサイズはスケーラブルです。常に舞台裏で多くの人が関わっています。視聴者に素晴らしい体験を提供するために、すべての人が一生懸命働いています。もちろん自分ですべてを行うこともできます!
また、あらゆる規模の制作についてヘルプやアドバイスが必要な場合。いつでもご連絡ください!!

koo design studio ニュースレターのバックナンバーを確認してください